
Chronic Pain Management Electrode Placement Examples
March 9, 2025
How eir bands may help manage chronic pain through several mechanisms:
The mild electrical pulses stimulate sensory nerves, which can reduce the transmission of pain signals to the brain (often explained by the “gate control” theory), leading to decreased perception of pain during use.
Certain stimulation settings may also promote the release of natural pain-relieving chemicals such as endorphins, supporting longer-lasting comfort and relaxation.
In addition, electrical stimulation can help reduce muscle tension and guarding in affected areas, easing tightness and stiffness.
It may also support local circulation, which can contribute to improved tissue comfort and reduced feelings of heaviness or discomfort in chronically painful regions.
Pain location varies and eir bands work best when the current passes directly through the painful tissue.
Neck Pain
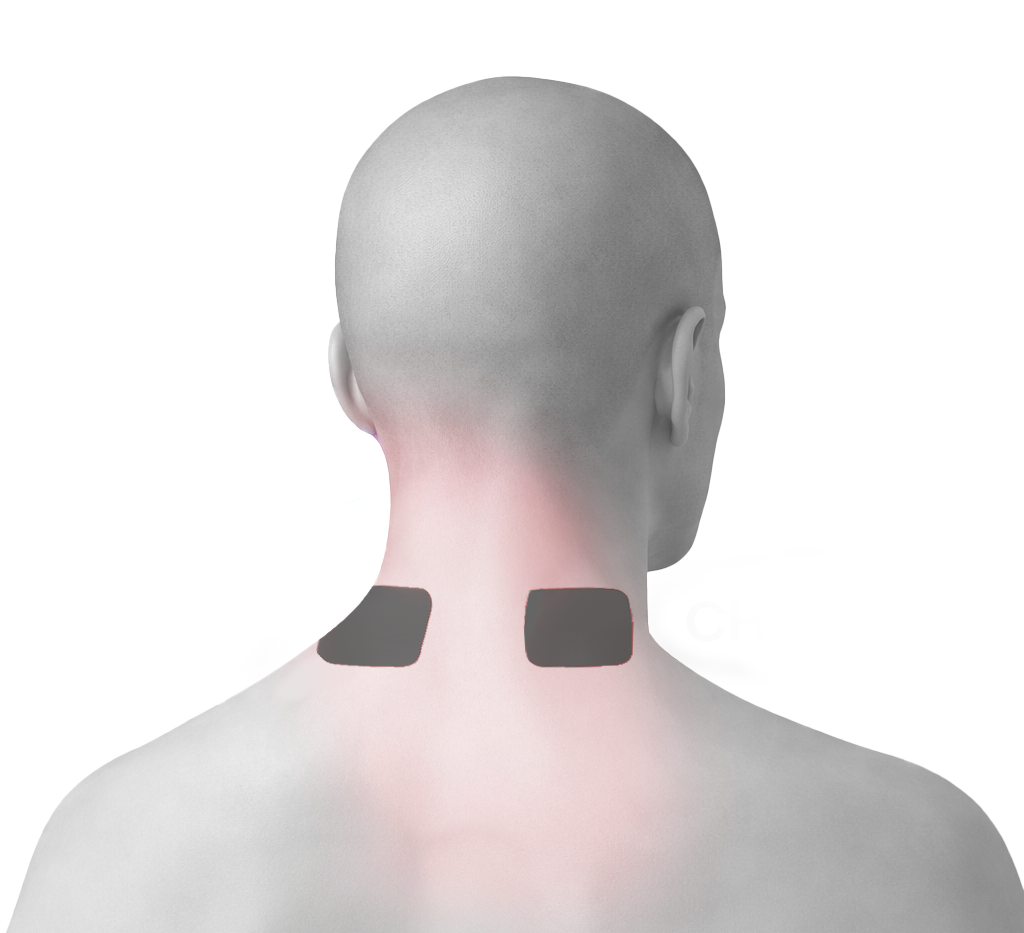
Electrode Placement:
First Electrode: One on the left side of the neck
Second Electrode: One on the right side of the neck
This setup targets:
Upper trapezius muscles
Base of the neck
Tension-related neck stiffness
Screen / posture strain
On soft muscle, not on the spine.
Shoulder Pain Example 1
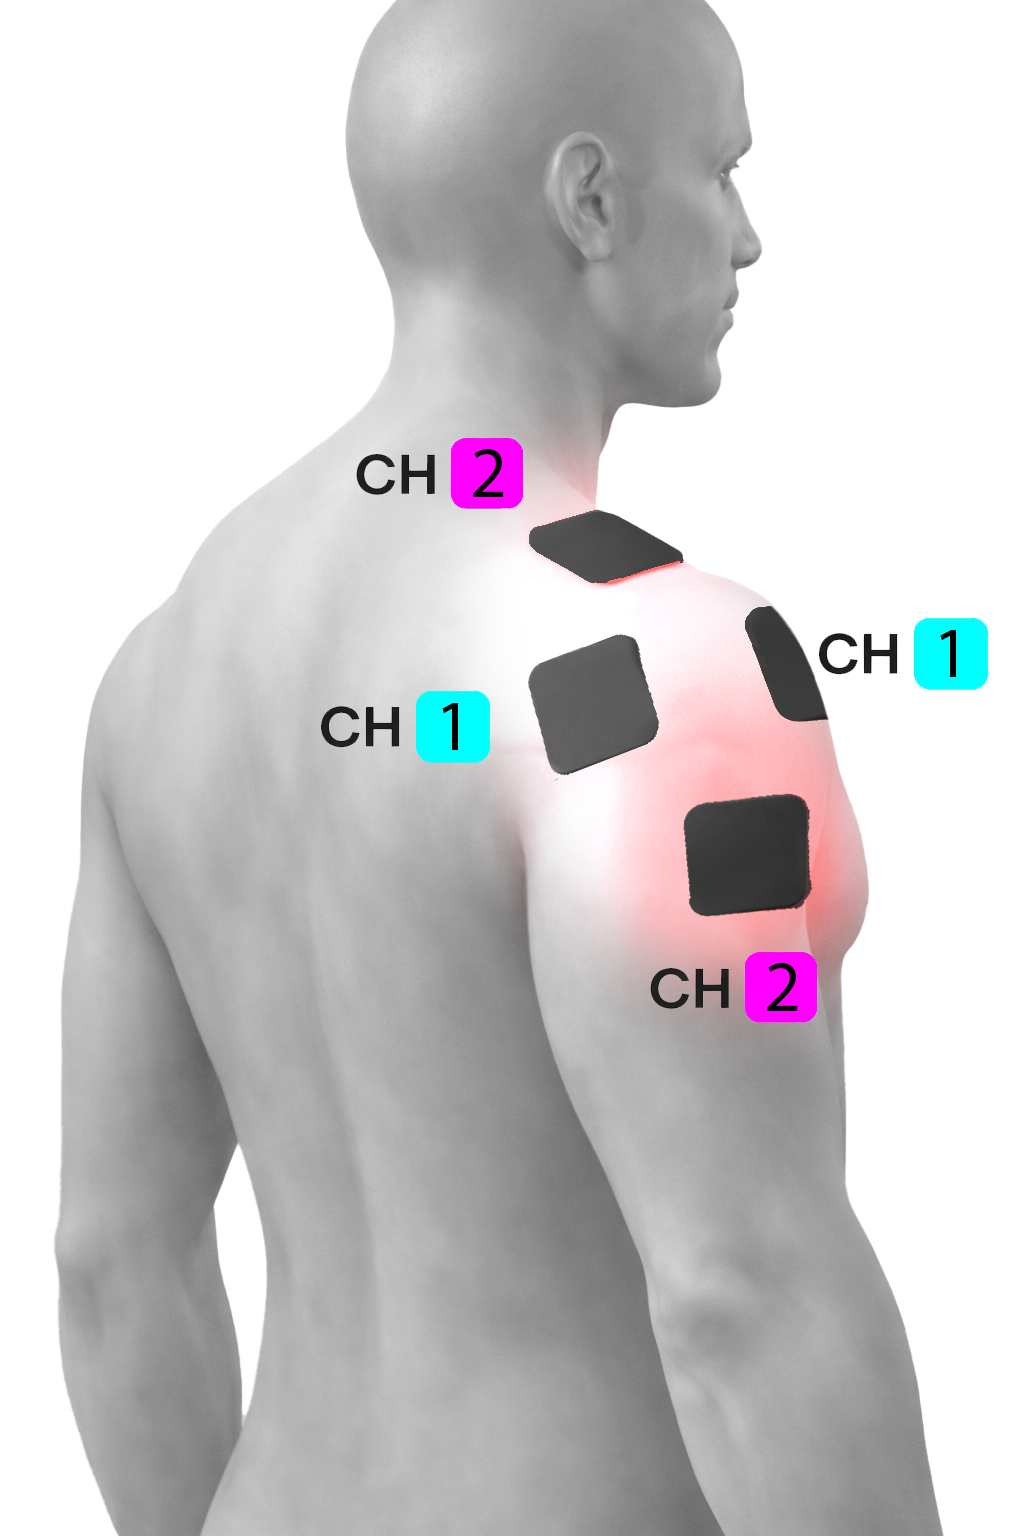
Electrode Placement:
CH1 (Deltoid region):
First Electrode: on the side of the shoulder
Second Electrode: slightly lower on the upper arm
CH2 (Upper support pair):
First Electrode: on the upper shoulder near the collarbone
Second Electrode: slightly lower toward the front/side of the shoulder.
This setup targets:
Pain spreads across the shoulder joint
There is both front and side shoulder pain
Pain radiates slightly down the upper arm
Postural or rotator cuff–related discomfort
Widespread inflammation rather than one small point
This creates intersecting current paths through the shoulder joint.
Shoulder Pain Example 2
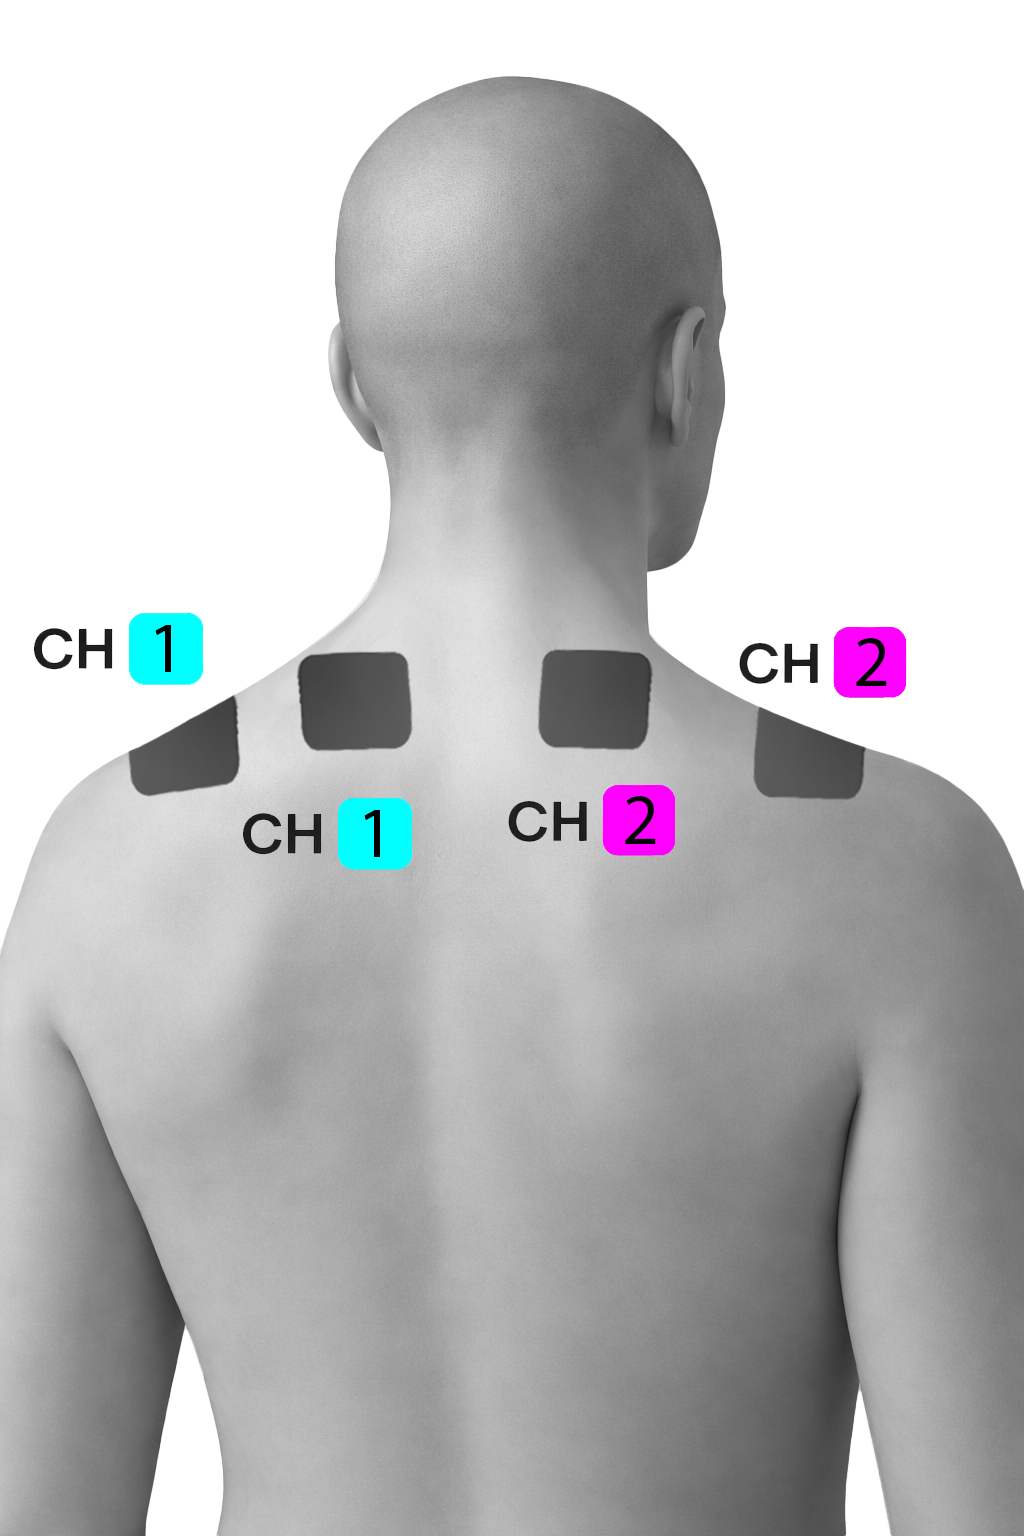
Electrode Placement:
CH1 (Left side):
One electrode on the upper shoulder
One electrode along the shoulder
CH2 (Right side):
Mirror the same placement on the opposite shoulder
This setup targets:
Upper shoulder tension
Neck-to-shoulder stiffness
Postural strain
Stress-related tightness
Bilateral shoulder discomfort
Electrodes are placed on the upper trapezius muscle, not on the spine.
Shoulders/Upper Back Pain
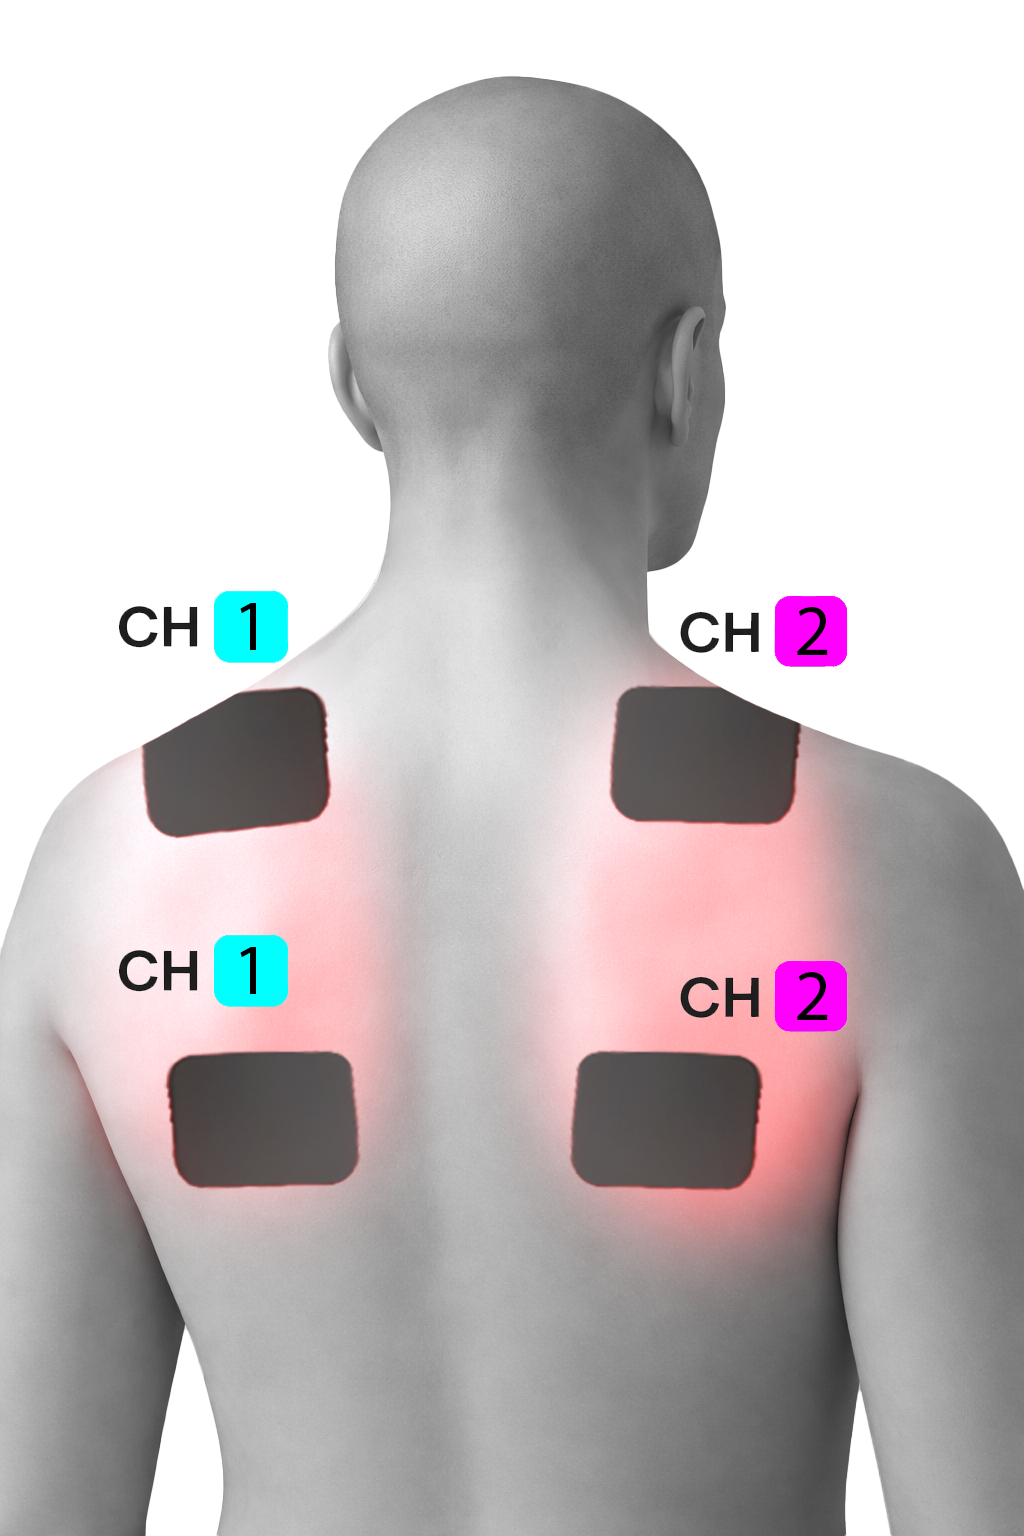
Electrode Placement:
CH1 (Left side):
One electrode on the upper left shoulder blade region
One electrode slightly lower on the same side
CH2 (Right side):
Mirror placement on the right shoulder blade region
This setup targets:
Upper back pain
Shoulder blade discomfort
Postural strain
Desk-related tension
Bilateral muscle tightness
Electrodes are placed on muscle, not directly on the spine.
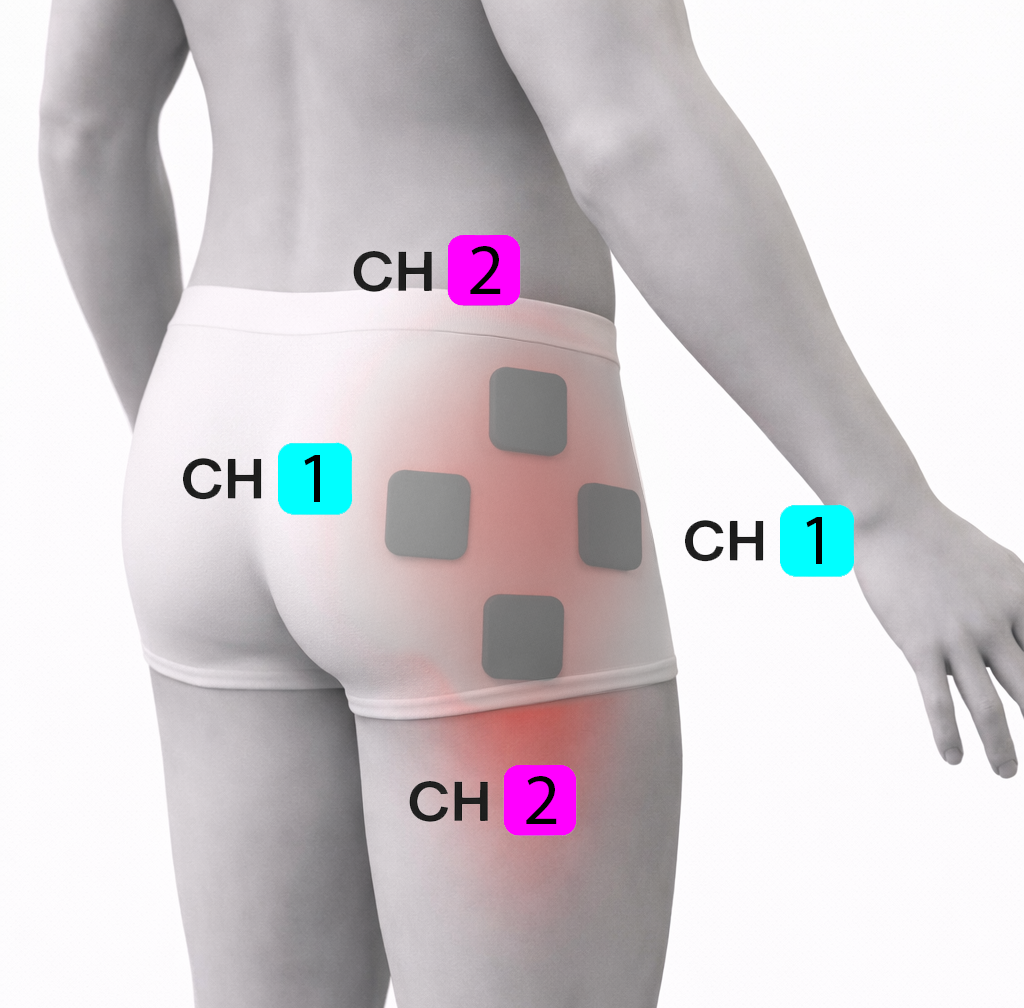
Sciatica Pain
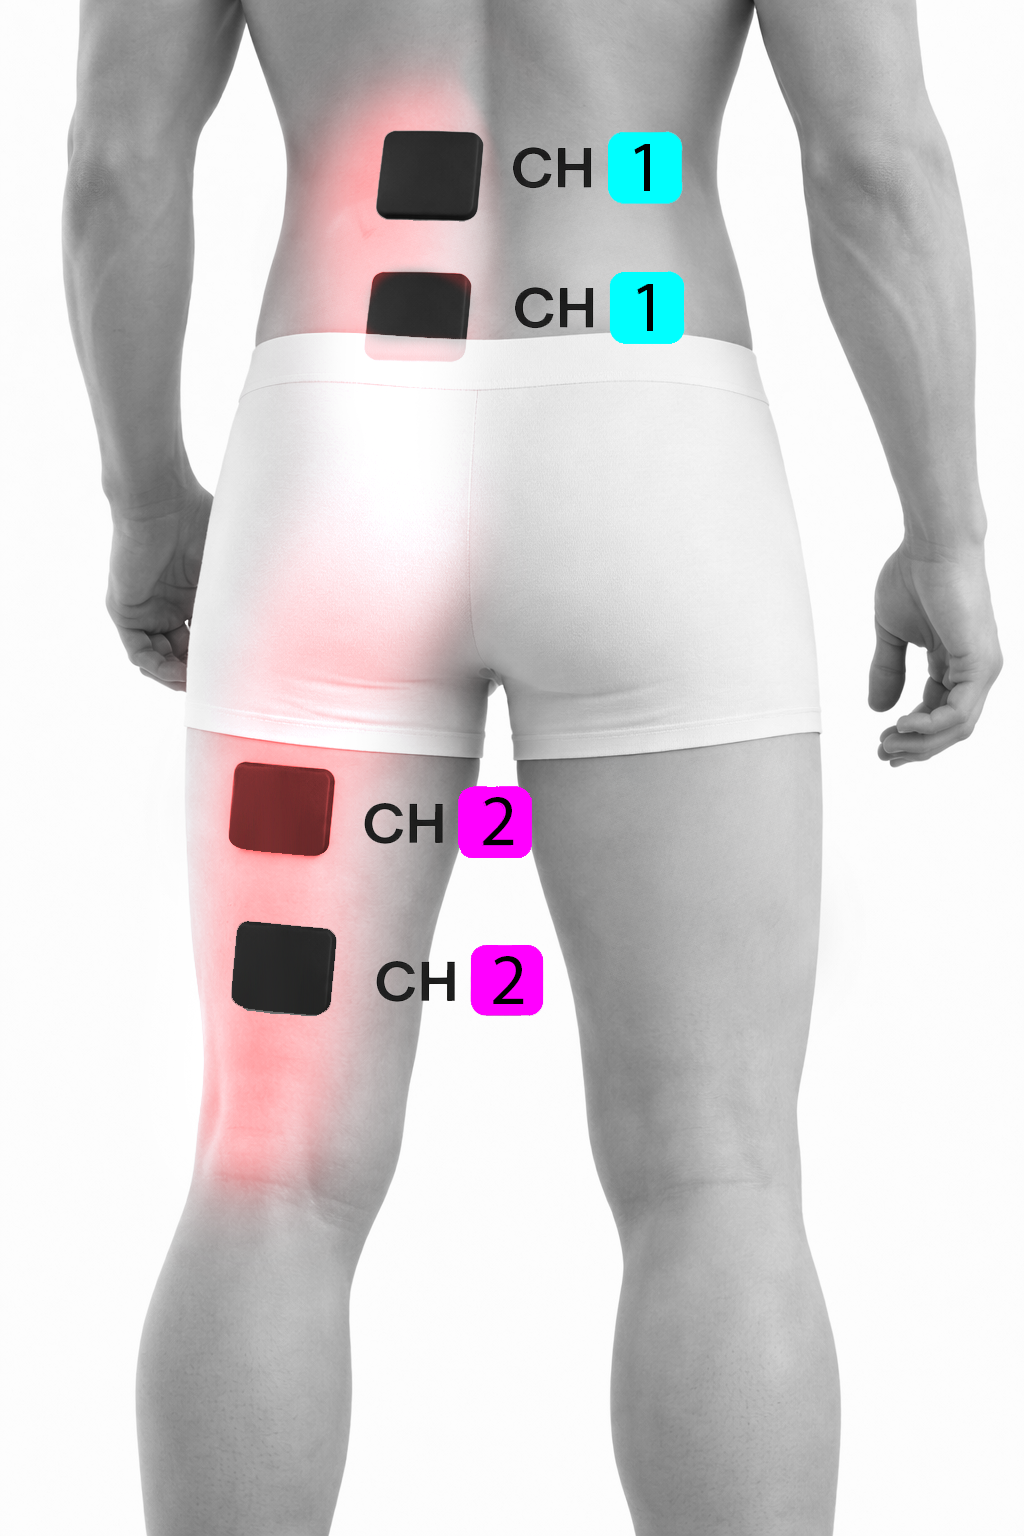
Electrode Placement:
CH1 (Upper pair):
electrodes placed on the lower back, one above the other
Targeting the lumbar nerve root region
CH2 (Lower pair):
electrodes placed along the buttock / back of thigh
Following the sciatic nerve pathway
This setup targets:
Sciatic nerve irritation
Pain radiating from lower back into buttock and thigh
Shooting or burning leg pain
Lumbar nerve root irritation
The placement follows the pain from the spine down the leg.
Lower Back Pain
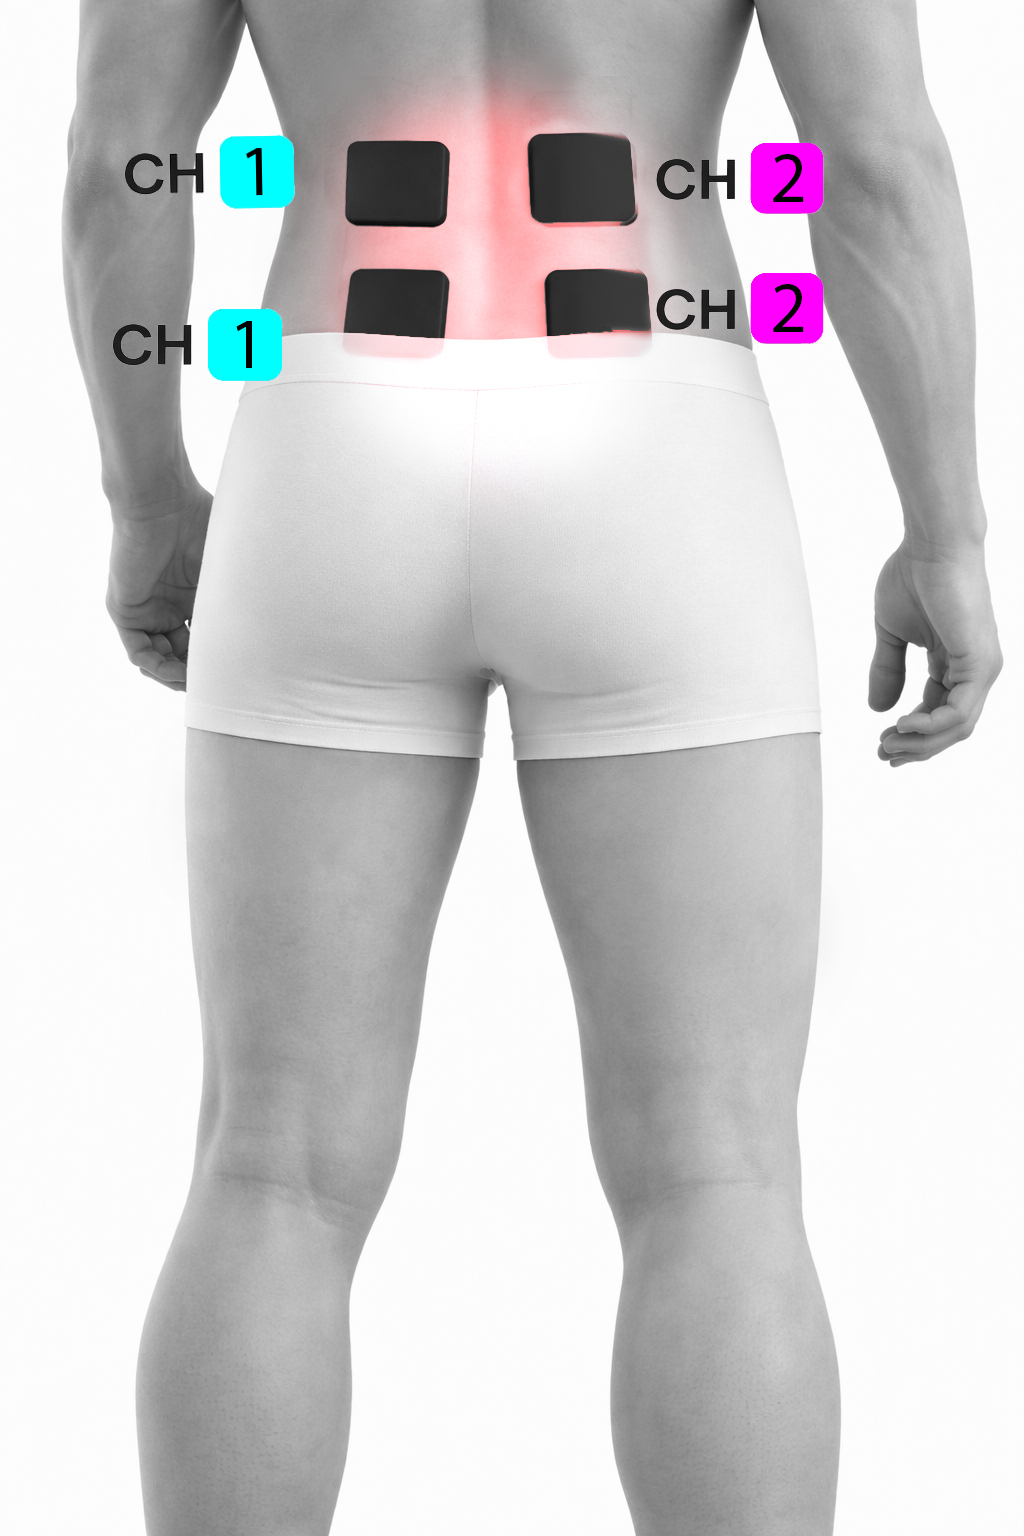
Electrode Placement:
CH1 (Left vertical pair):
One electrode on the left lower back
One electrode directly below on the same side
CH2 (Right vertical pair):
Mirror placement on the right side
This setup targets:
Central lower back pain
Muscle spasm
Lumbar strain
Postural or lifting-related pain
Widespread lower back discomfort
Electrodes are positioned on the muscle, not directly on the spine.
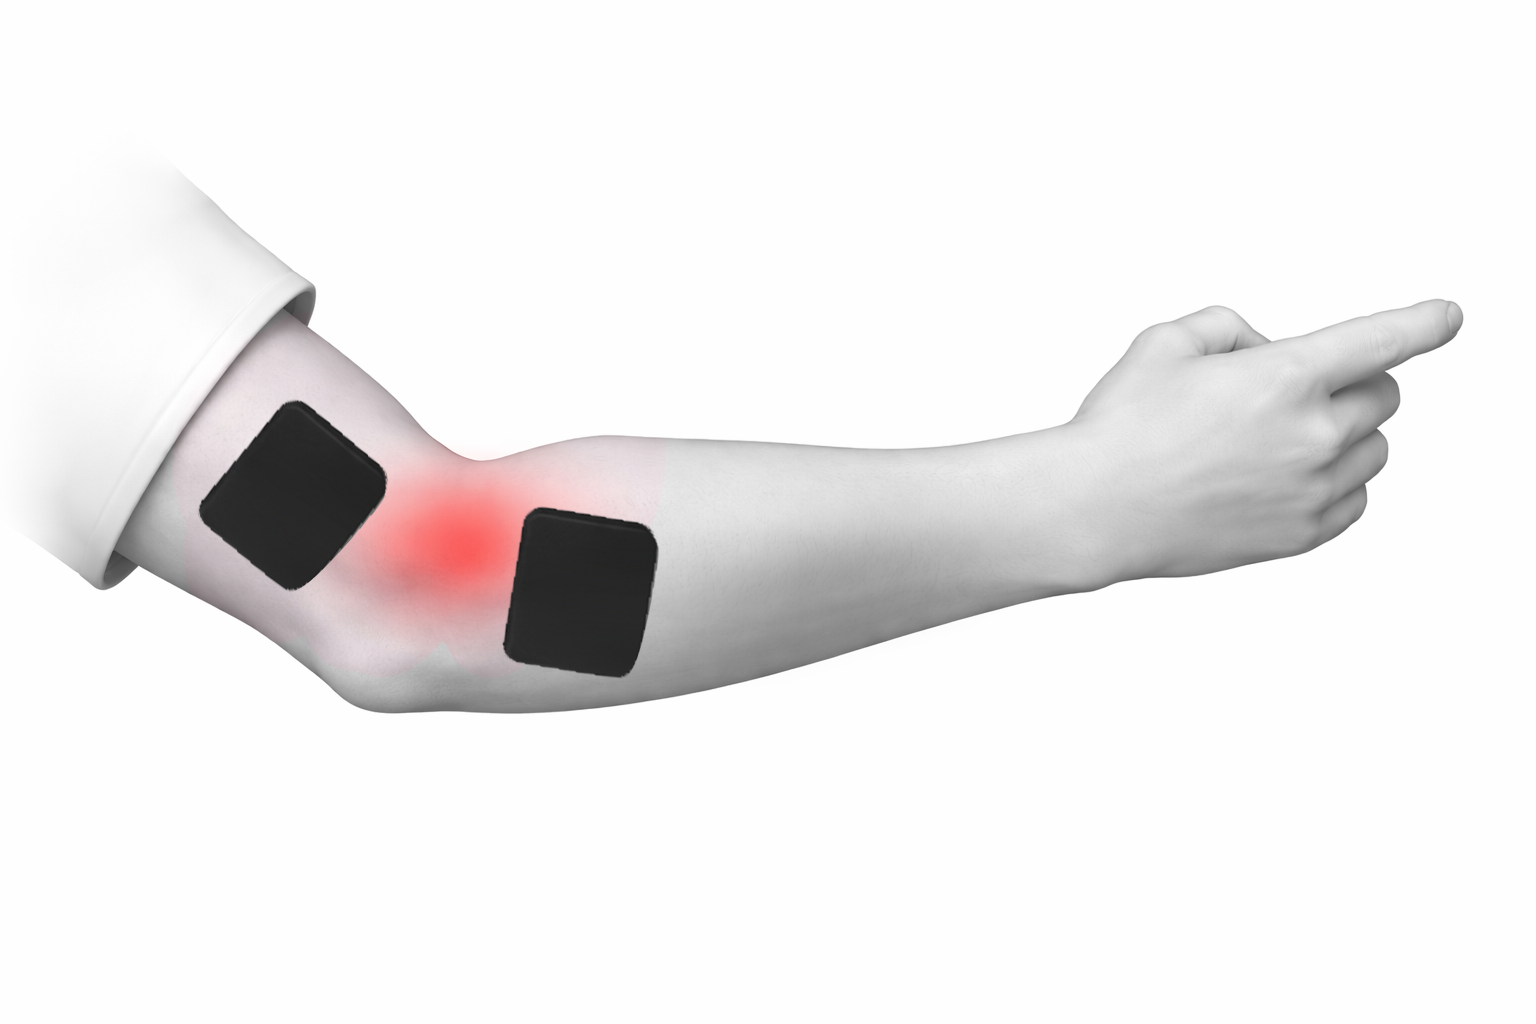
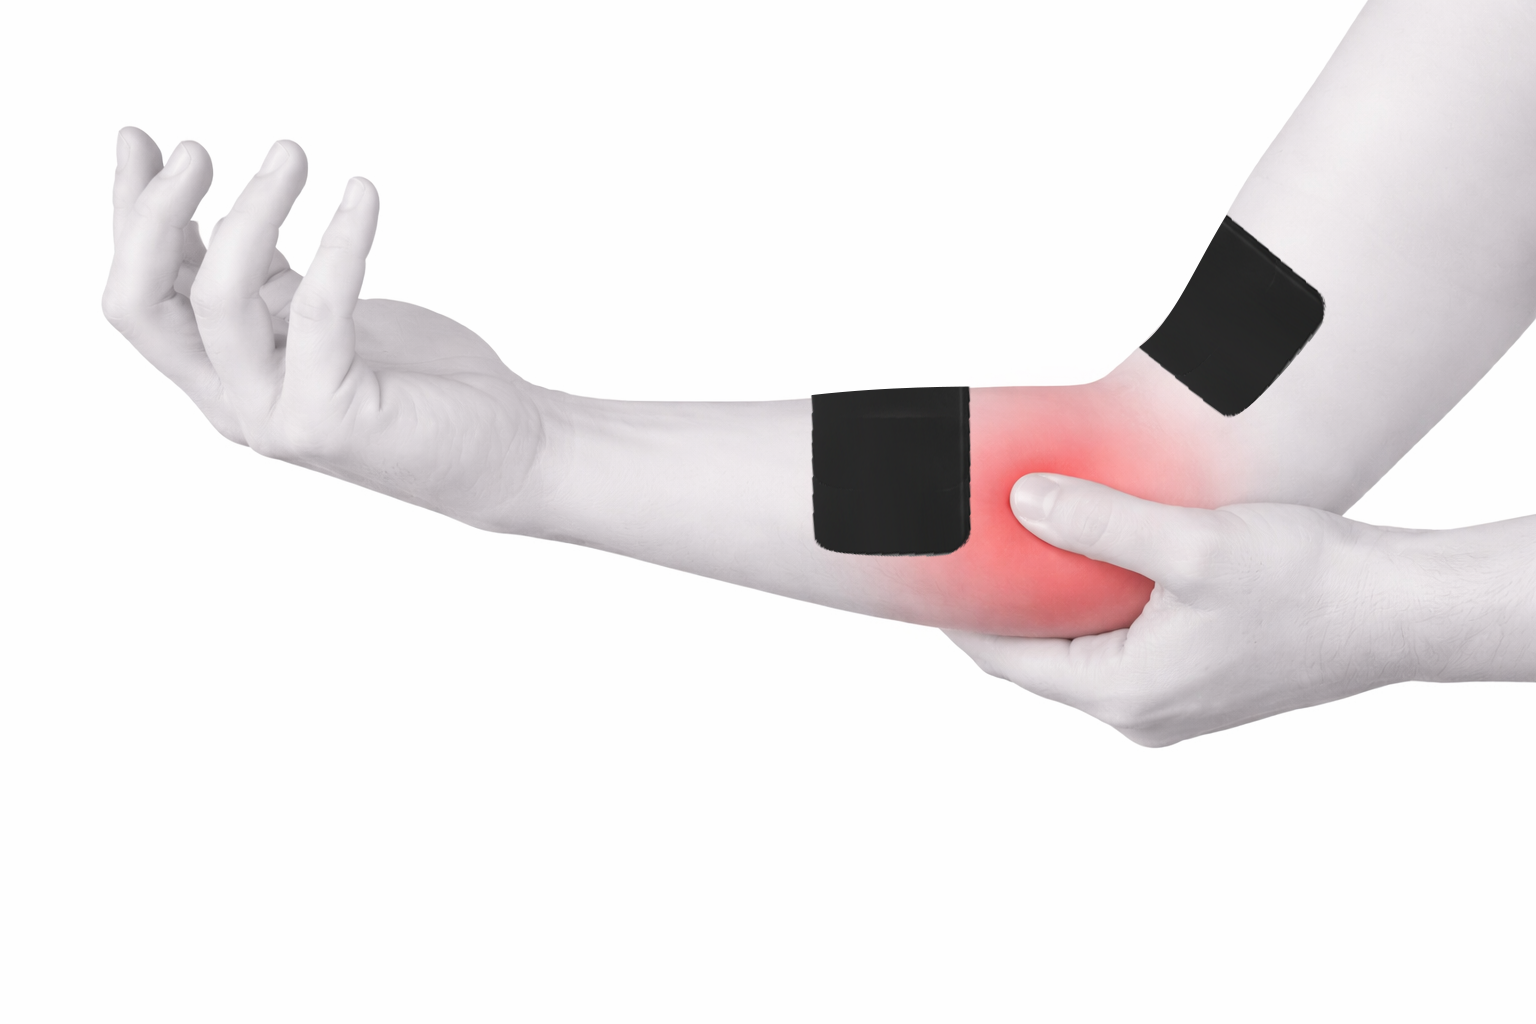
Elbow Pain Example 1
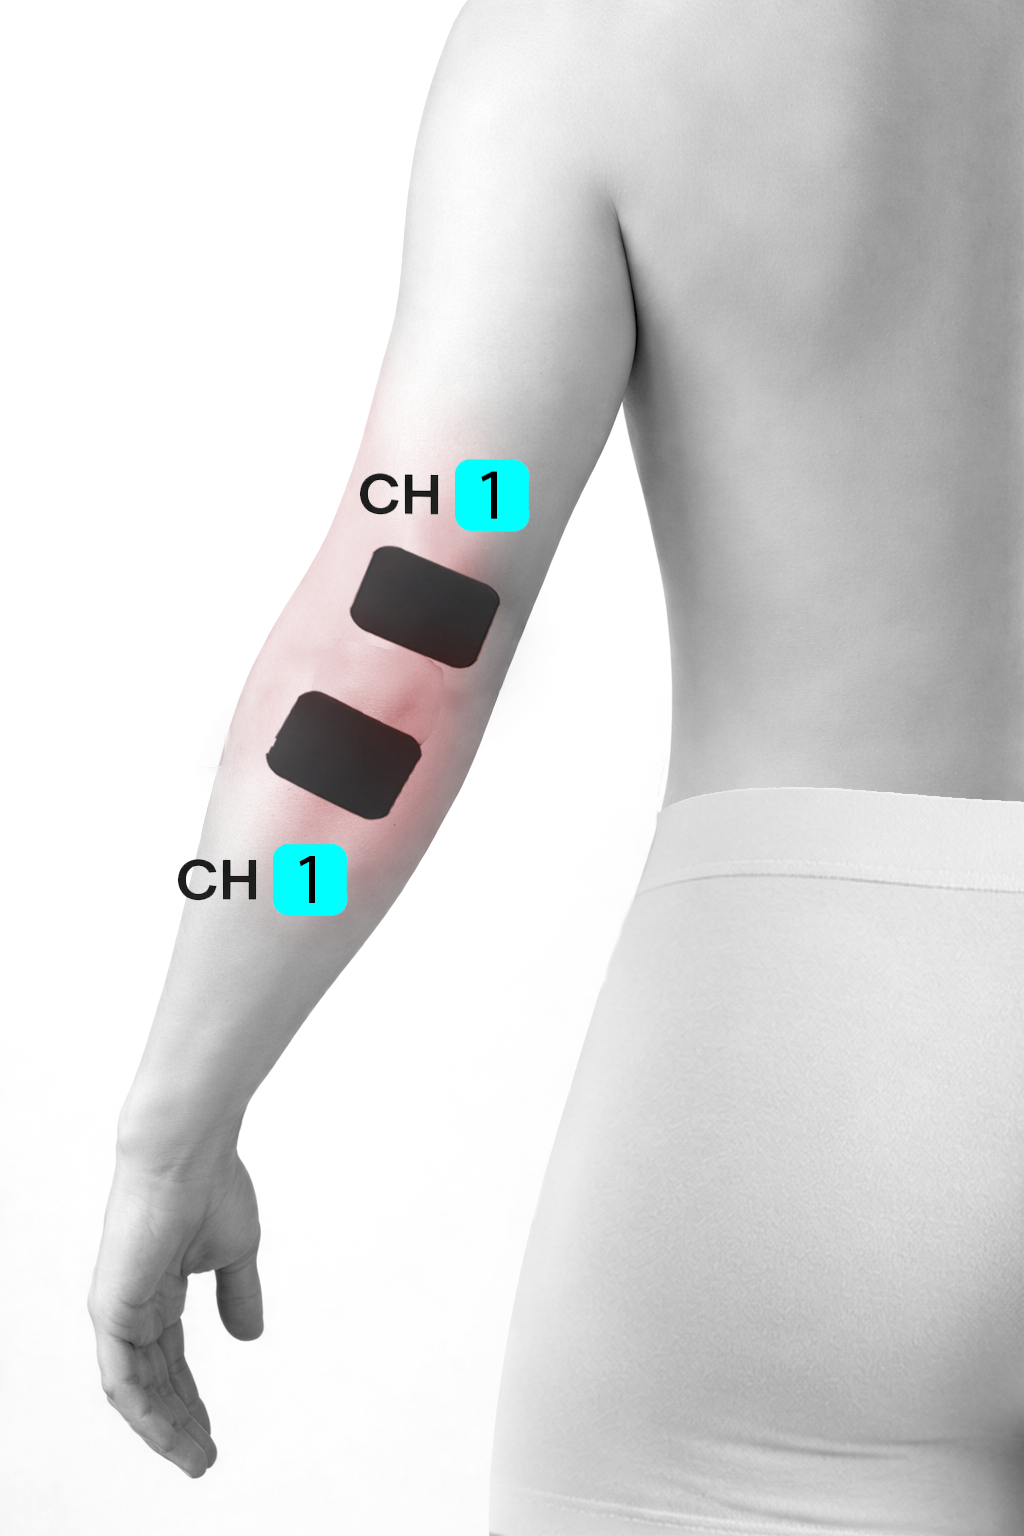
Electrode Placement:
First Electrode: just above the elbow tip
Second Electrode: just below the elbow tip
This setup targets:
Local swelling and inflammation
Tenderness when leaning on the elbow
Avoid direct placement on the bony point itself.
Elbow Pain Example 2
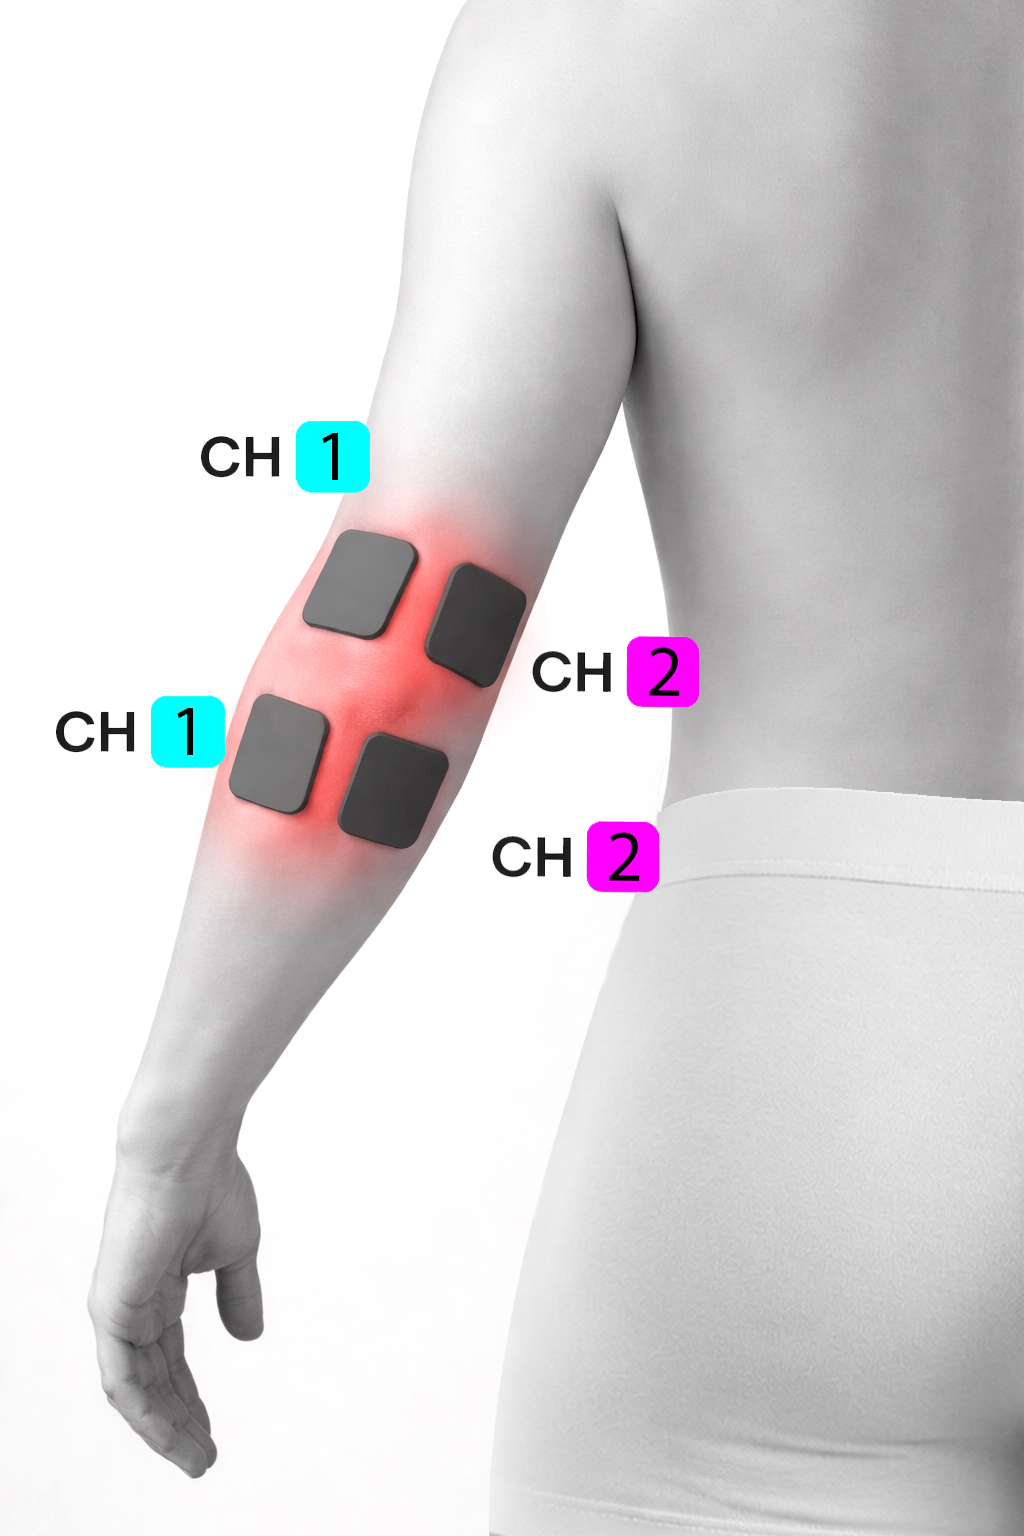
Electrode Placement:
CH1 (Outer Elbow – Vertical Pair)
Place two pads along the outer side of the elbow and upper forearm.
Position one pad just above the outer elbow and the second pad directly below it on the outer forearm, forming a vertical line along the muscle.
CH2 (Inner Elbow – Vertical Pair)
Place two pads along the inner side of the elbow and forearm.
Position one pad just above the inner elbow and the second pad directly below it, again forming a vertical line along the inner forearm.
This setup targets:
This dual-channel setup surrounds the elbow joint, targeting both inner and outer structures when discomfort is widespread rather than sharply localised.
Elbow Pain Example 3 (Tennis Elbow Pain)
Electrode Placement:
Place electrodes around the bony area on the outside of the elbow.
Position electrodes to frame the painful tendon.
This setup targets:
Tennis Elbow (Lateral Epicondylitis), The electrodes should be placed around the bony protrusion on the outside of the elbow to surround the painful tendon, or in a cross-pattern on the upper forearm.
Outer elbow tendon irritation from gripping, lifting, or wrist extension.
Elbow Pain Example 4 (Golfer’s Elbow Pain)
Electrode Placement:
Place electrodes around the inner bony bump of the elbow.
Frame the inflamed flexor tendon region.
This setup targets:
Golfer’s elbow (medial epicondylitis) causes pain on the inner, bony bump of the elbow (medial epicondyle) due to inflamed tendons from repetitive wrist/finger flexion.
Inner elbow tendon irritation from repetitive wrist and finger flexion. May include weakness or pain radiating down the inner forearm.
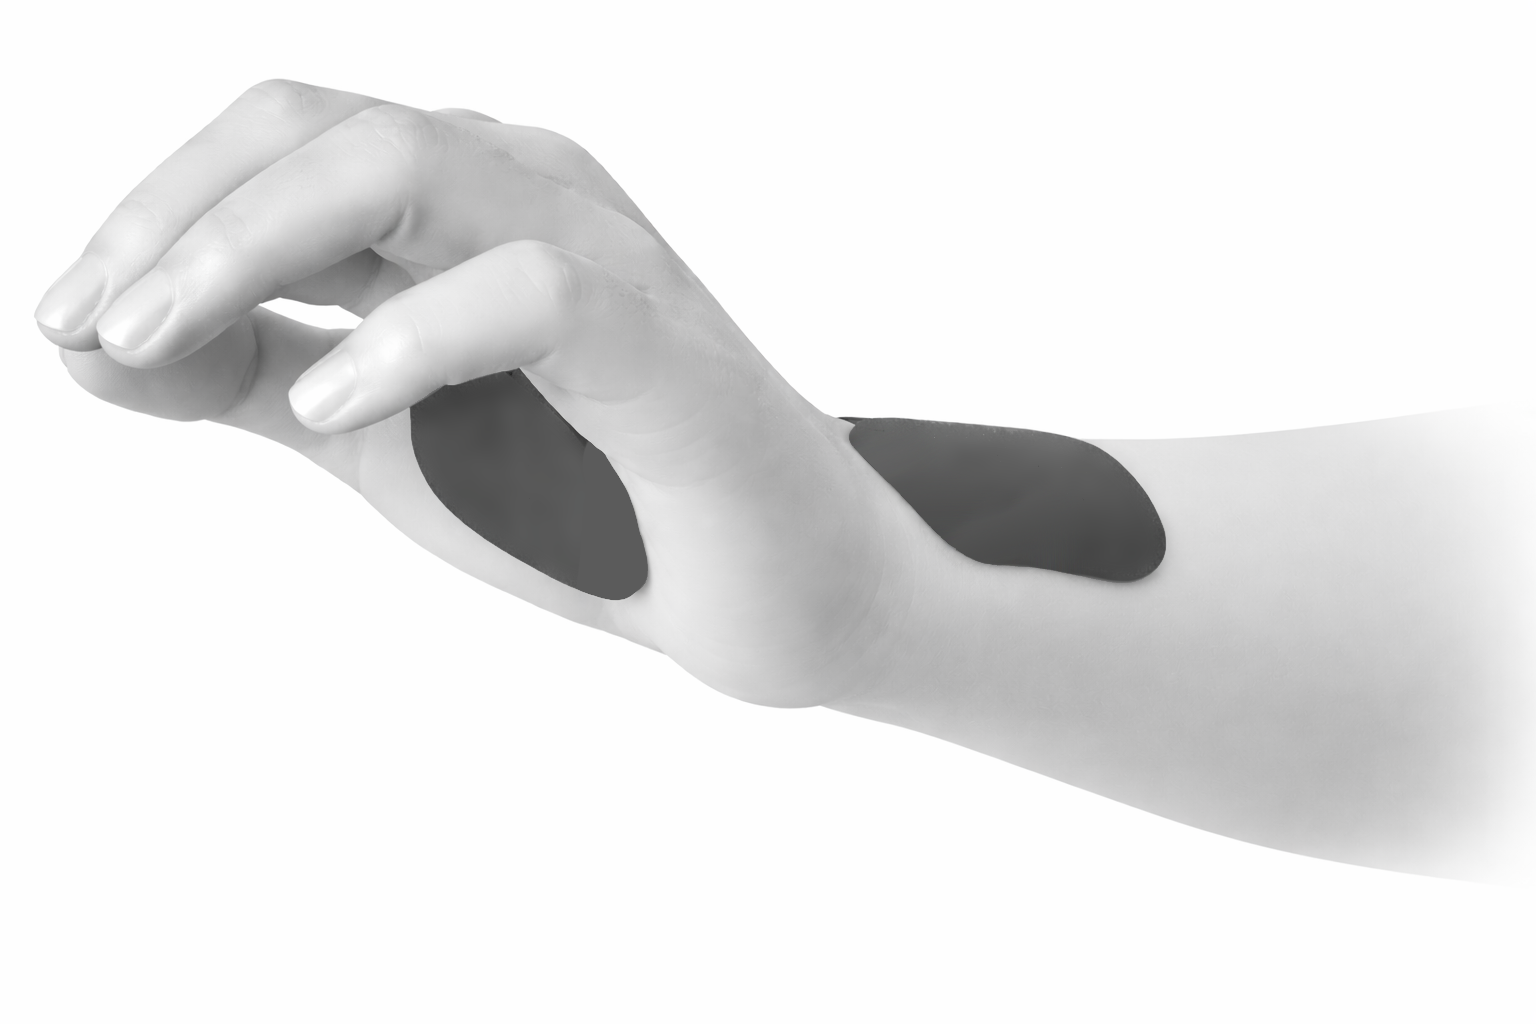
Wrist Pain Example 1 (Tendon Overuse for Irritation)
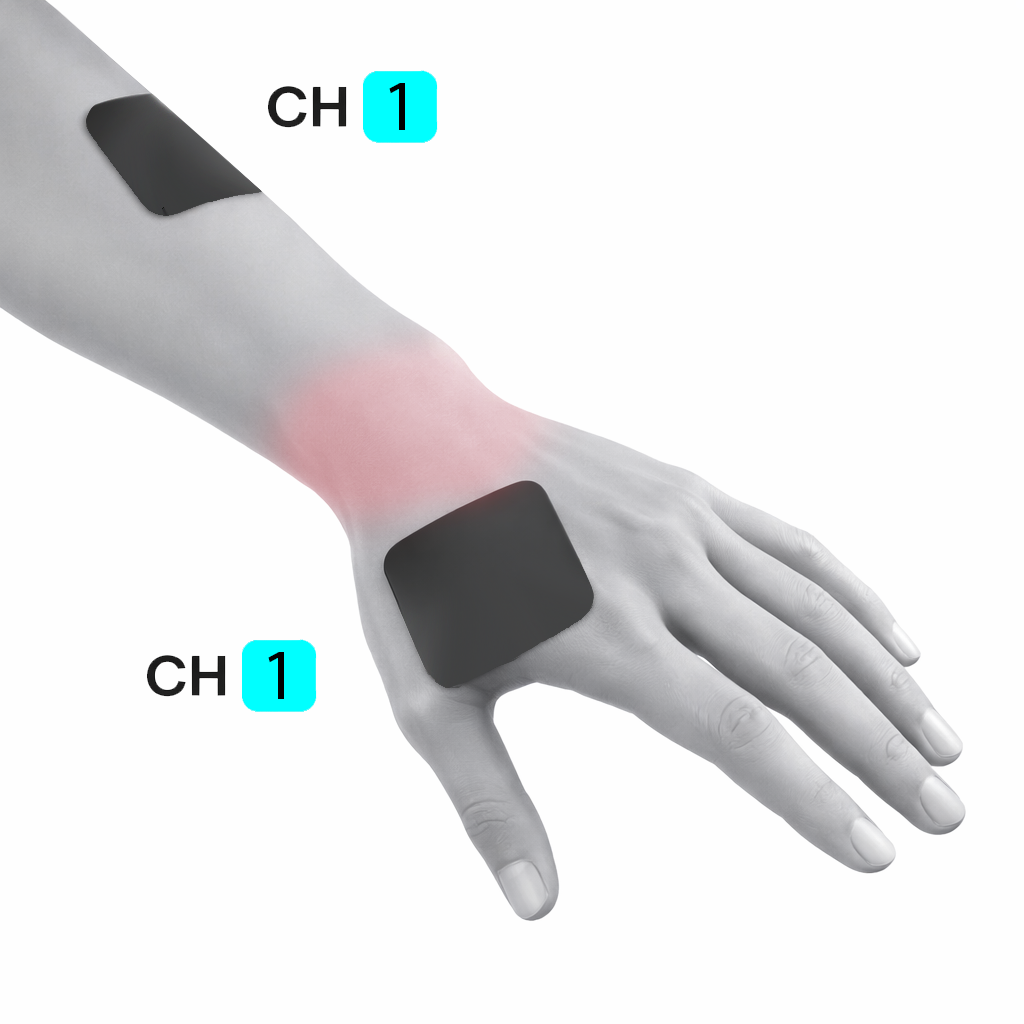
Electrode Placement:
First Electrode: over the back of the hand near the base of the thumb.
Second Electrode: further up the forearm along the same tissue line.
This setup targets:
Back-of-wrist pain
Thumb-side tendon irritation
Overuse from typing or mouse use
Early repetitive strain
It focuses more on dorsal wrist tendons and soft tissue and is better for tendon strain than pure nerve compression.
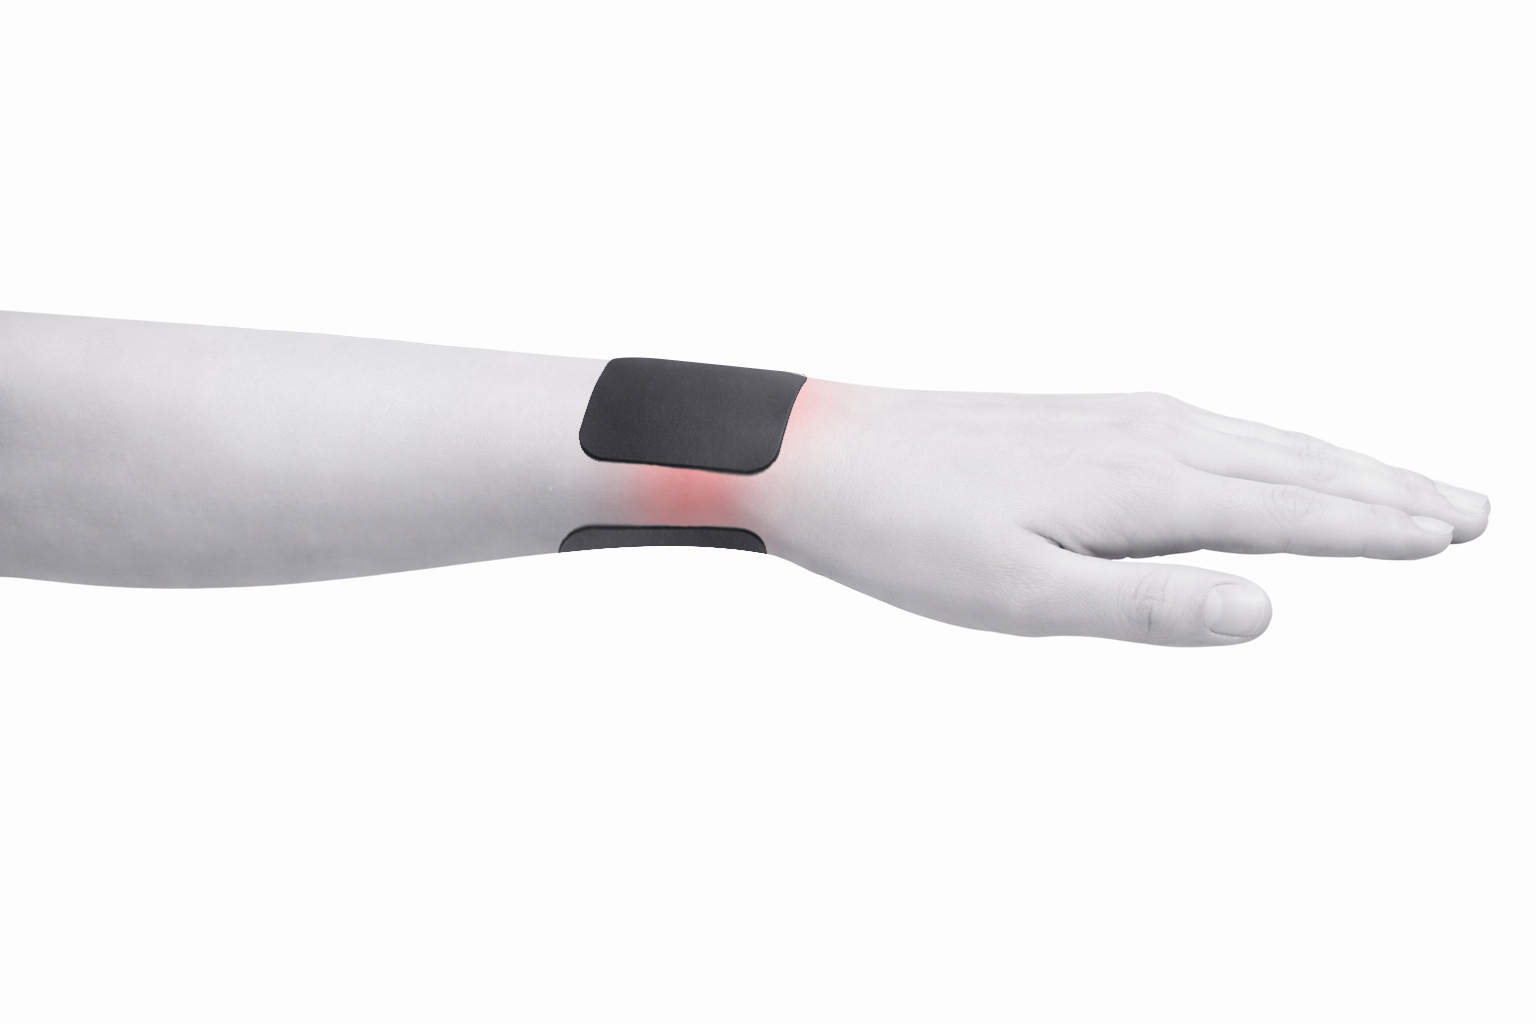
Wrist Pain Example 2 (Thumb-side Wrist Soreness, Early Repetitive Strain Injury)
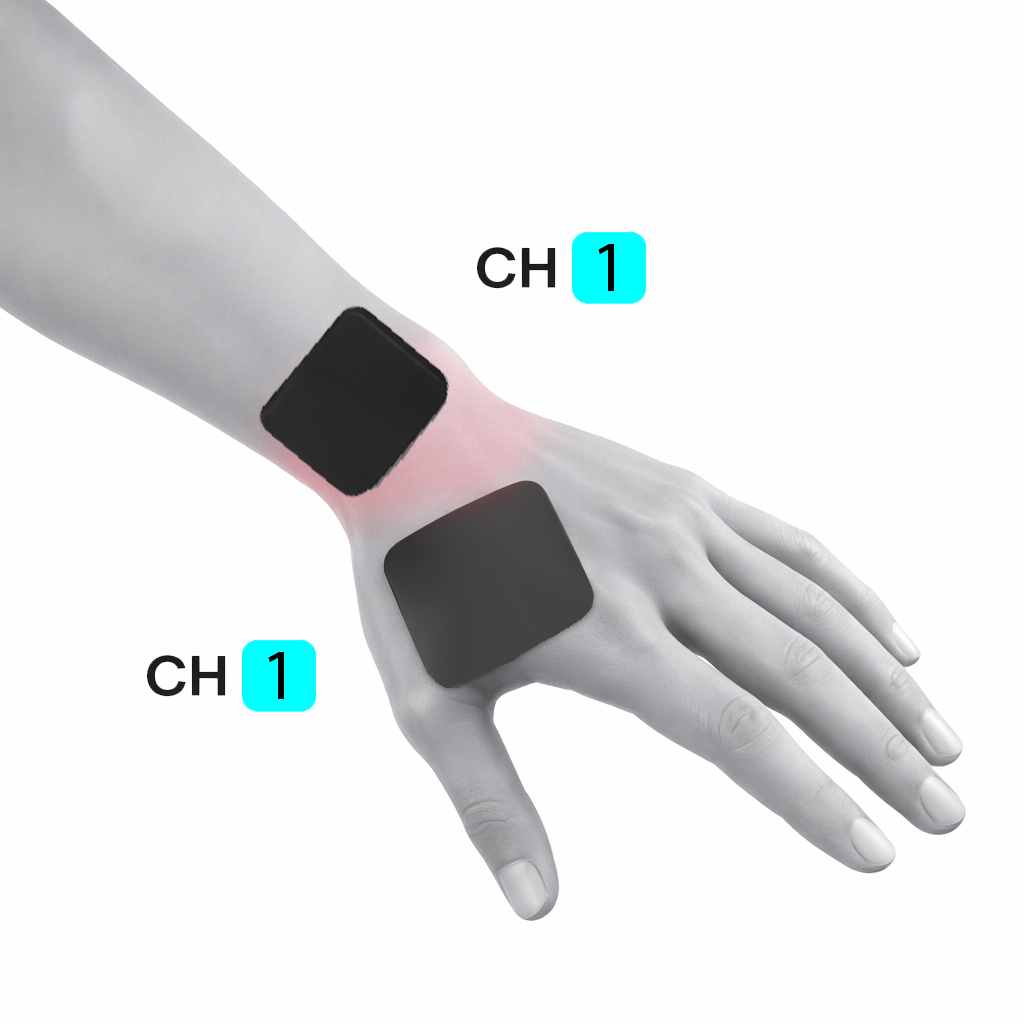
Electrode Placement:
First Electrode: sits on the wrist.
Second Electrode: over the back of the hand near the base of the thumb.
This Placement Targets:
Radial (thumb-side) wrist structures
Extensor tendons
Mixed nerve + tendon irritation
Overuse from typing / mouse / gripping
More dorsal/tendon focused, less tunnel-specific
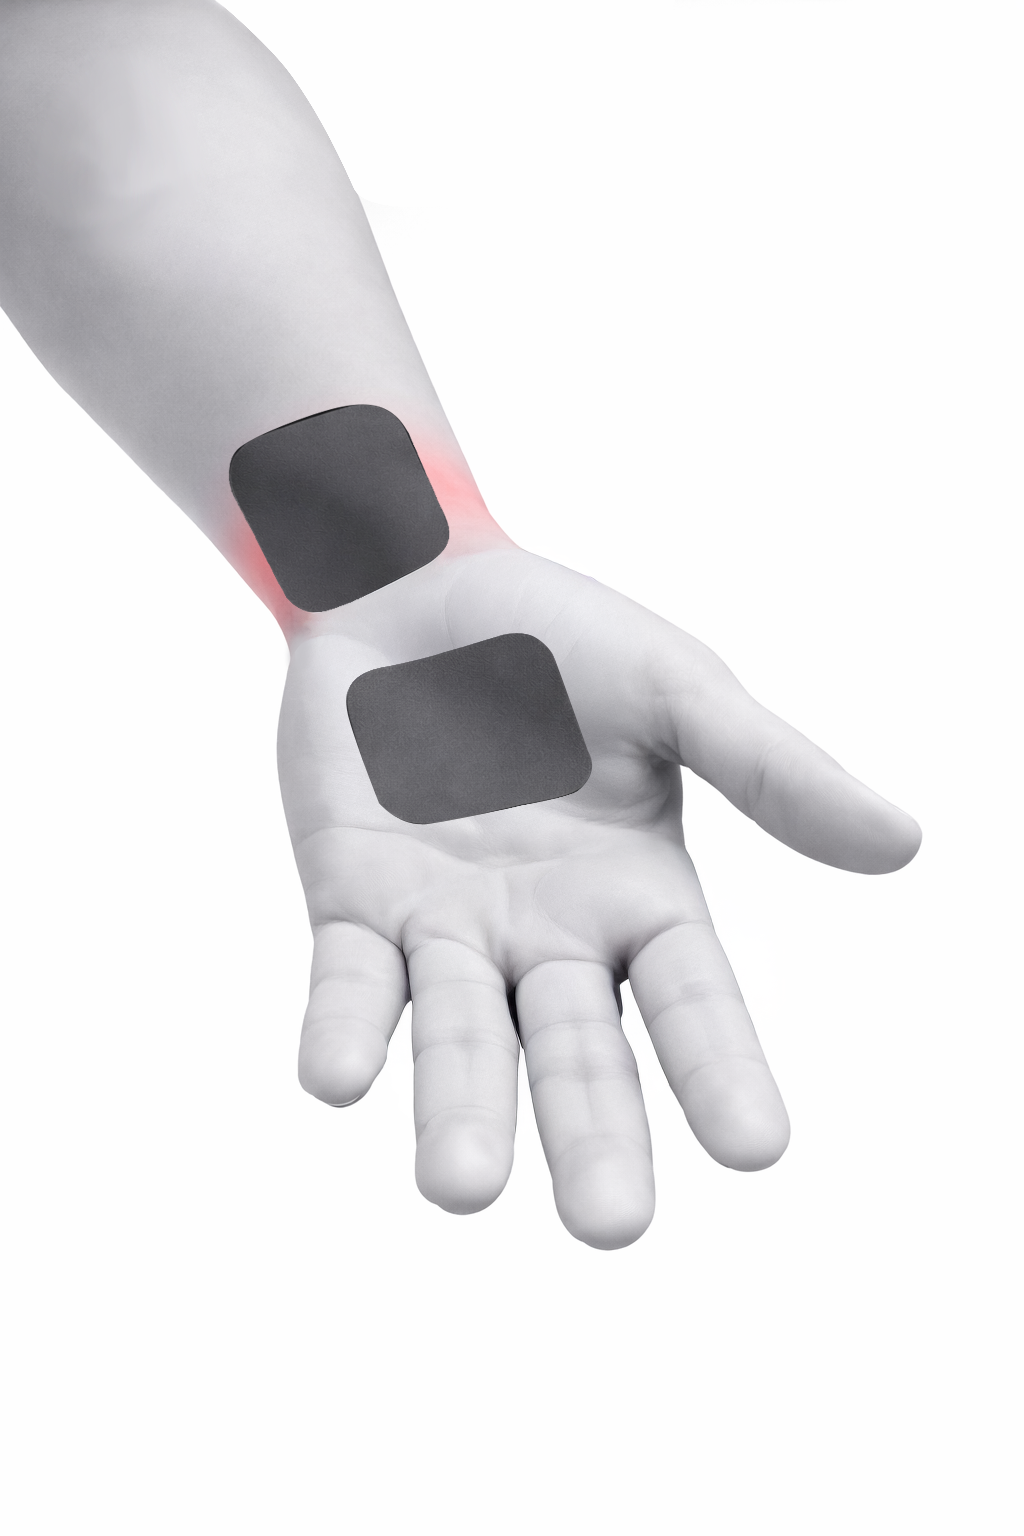
Carpal Tunnel Pain Example 1 (Thumb Dominant Symptoms)
Electrode Placement:
First Electrode: Base of thumb (palm)
Second Electrode: Outer wrist
This setup targets:
Diagonal across the wrist (thumb side)
Early carpal tunnel
Mixed nerve + tendon irritation
Pain triggered by gripping or mouse use
The base of the thumb contains the sensory area of the median nerve, and the outer wrist position sits near the carpal tunnel entrance region.
Carpal Tunnel Pain Example 2 (Clear Nerve Dominant Symptoms)
Electrode Placement:
First Electrode: Inner palm (base of thumb / thenar area)
Second Electrode: Inner wrist or forearm
This setup targets:
Straight along the median nerve into the tunnel.
Numbness in thumb, index, middle fingers
Night tingling
The inner palm reflects the median nerve’s sensory area, and the inner wrist sits at the tunnel entrance — this placement directly Targets: the compressed nerve.
Carpal Tunnel Pain Example 3 (Front Wrist + Back Wrist)
Electrode Placement:
First Electrode: Front of wrist
Second Electrode: Back of wrist (same level)
This Placement Targets:
The median nerve runs through the centre of the wrist.
Carpal tunnel symptoms are caused by compression in that central space.
Deep wrist pressure
Central compression feeling
Mixed nerve + joint irritation
Current flow: Directly through the wrist (front → back). Strong central wrist coverage.
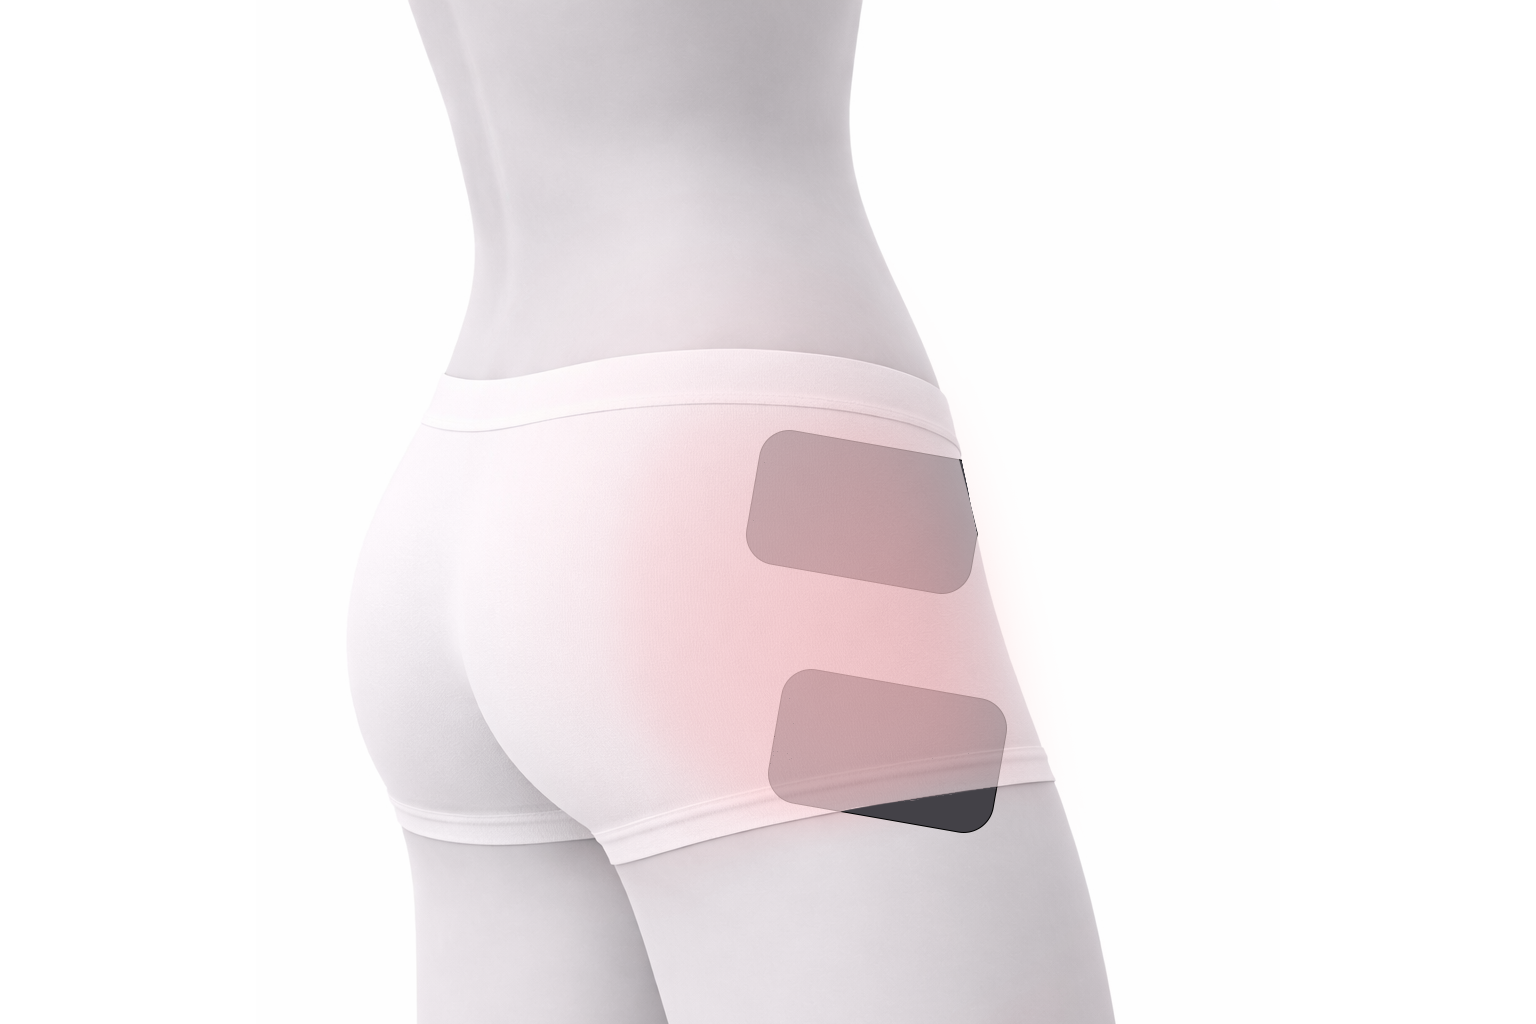
Hip Pain (Deep Central Pain)
Electrode Placement:
CH1 (horizontal pair):
Position electrodes horizontally, mirroring across the hip.
CH2 (vertical pair):
Place another pair vertically along the side of the hip.
This placement targets:
Beneath thick muscle
Near the joint capsule
Not just on the surface
Keep electrodes on soft tissue and avoid placing directly over prominent hip bones.
Hip Pain (Muscle Problem)
Electrode Placement:
Position electrodes horizontally, mirroring across the hip.
This setup targets:
Lateral hip muscle pain
Gluteus medius irritation
Iliotibial(IT) band–related discomfort
This horizontal placement allows the current to pass through the outer hip muscle from front to back for wider coverage.
Quadriceps Strain or Tendonitis (Option 1)
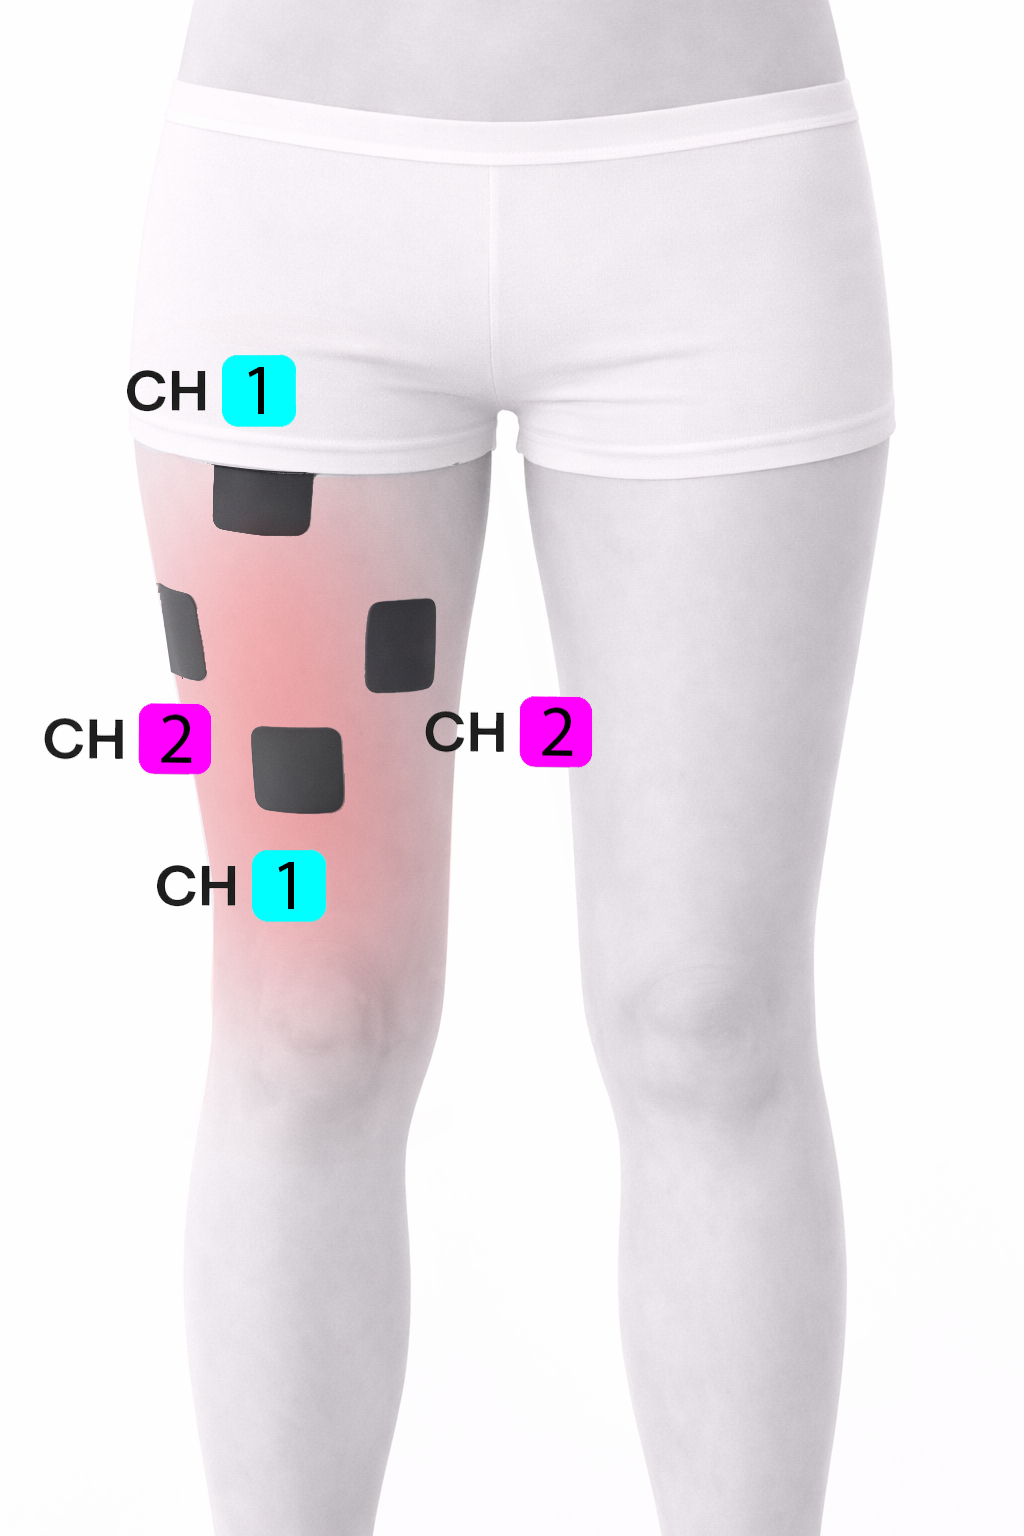
Electrode Placement:
CH1 (Vertical pair):
One electrode above the painful area
One electrode below the painful area
CH2 (Horizontal pair):
One electrode on the inner side of the thigh
One electrode on the outer side
This setup targets:
Large quadriceps strain
Widespread front thigh pain
Muscle tear recovery
Significant tendon irritation above the knee
Post-exercise soreness covering a broad area
Quadriceps Strain or Tendonitis (Option 2)
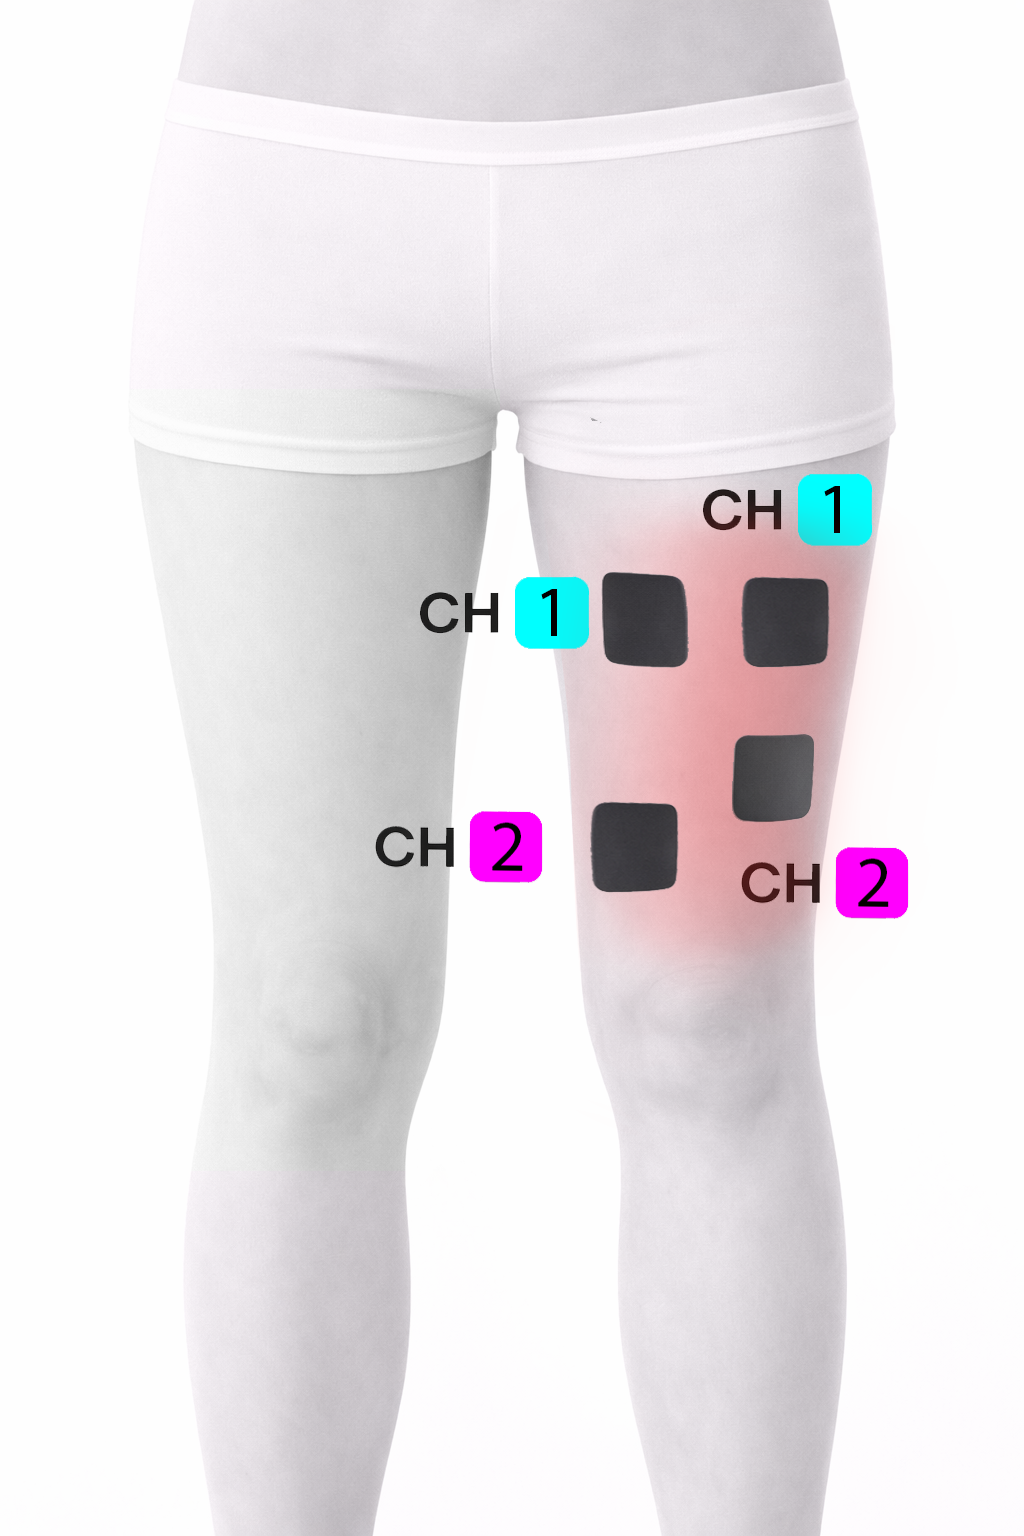
Electrode Placement:
CH1 (Upper pair):
Upper pair across the upper thigh
CH2 (Lower pair):
One electrode on the inner lower thigh (closer to the knee) and one on the outer mid-thigh.
This setup targets:
Broad front thigh pain
Quadriceps strain covering a long section
Muscle soreness extending from upper to lower thigh
Post-exercise inflammation
The slight offset helps the current pass more directly through the centre of the painful region. This increases overall coverage, stimulates a larger muscle area, and provides more uniform pain modulation.
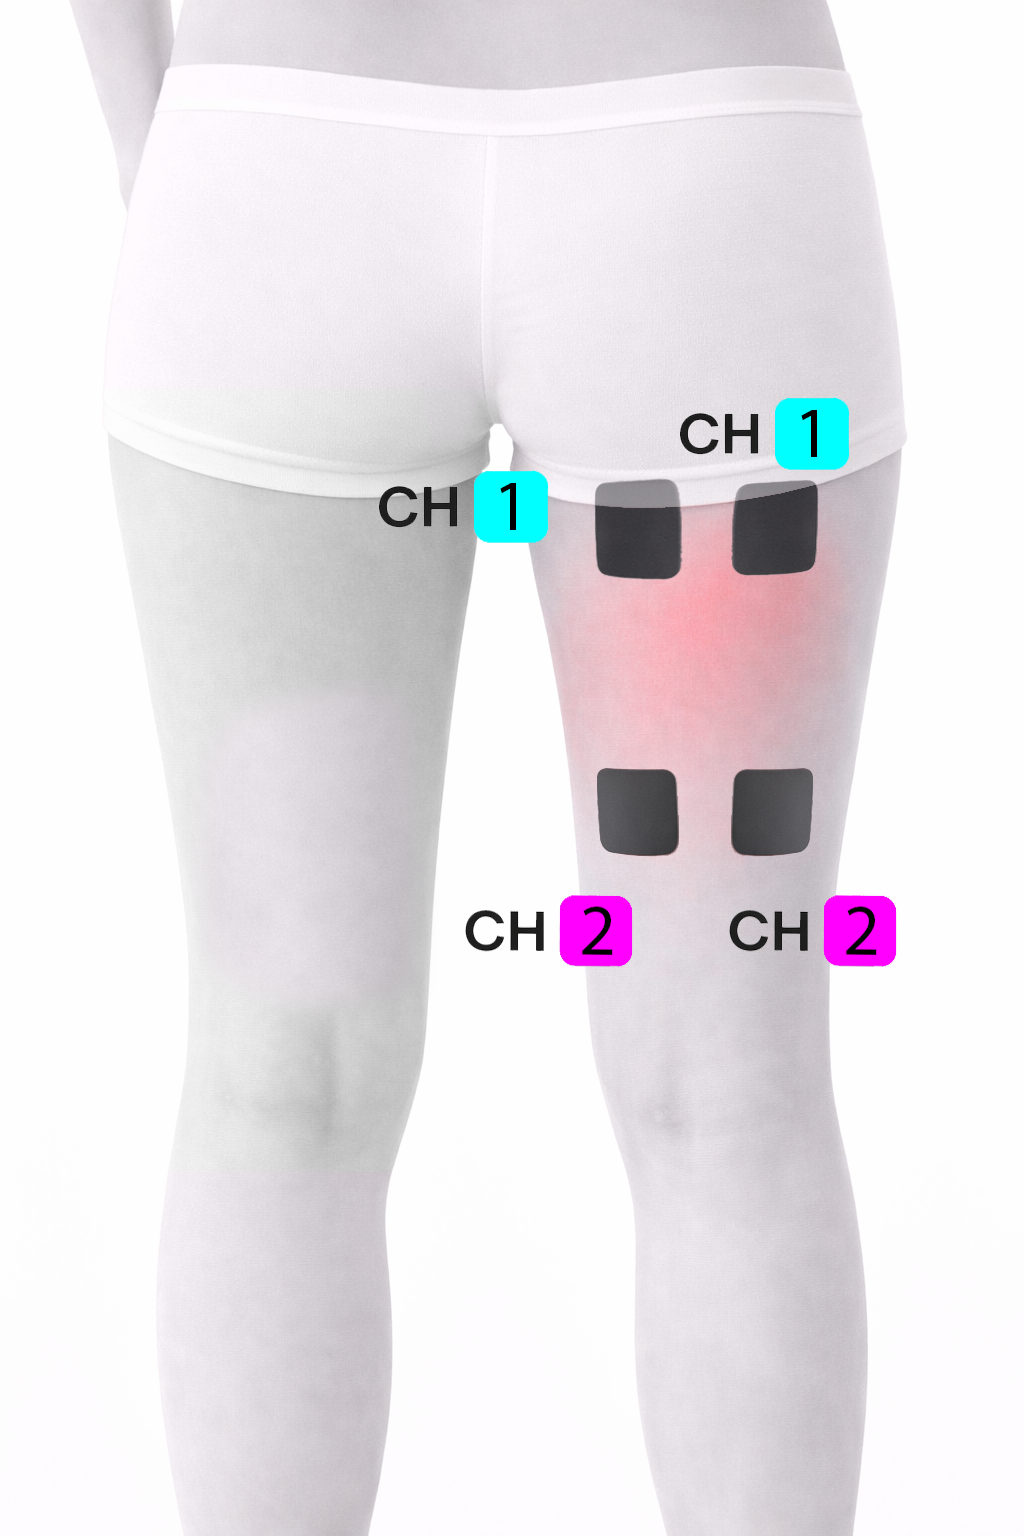
Hamstring Pain (Option 1)
Electrode Placement:
Vertical Pair (Along the Muscle)
CH1: Place one electrode high on the inner hamstring and one lower on the inner hamstring, following the length of the muscle.
CH2: Place one electrode high on the outer hamstring and one lower on the outer hamstring, also following the muscle line.
The current follows the muscle fibres, targeting the strained section directly.
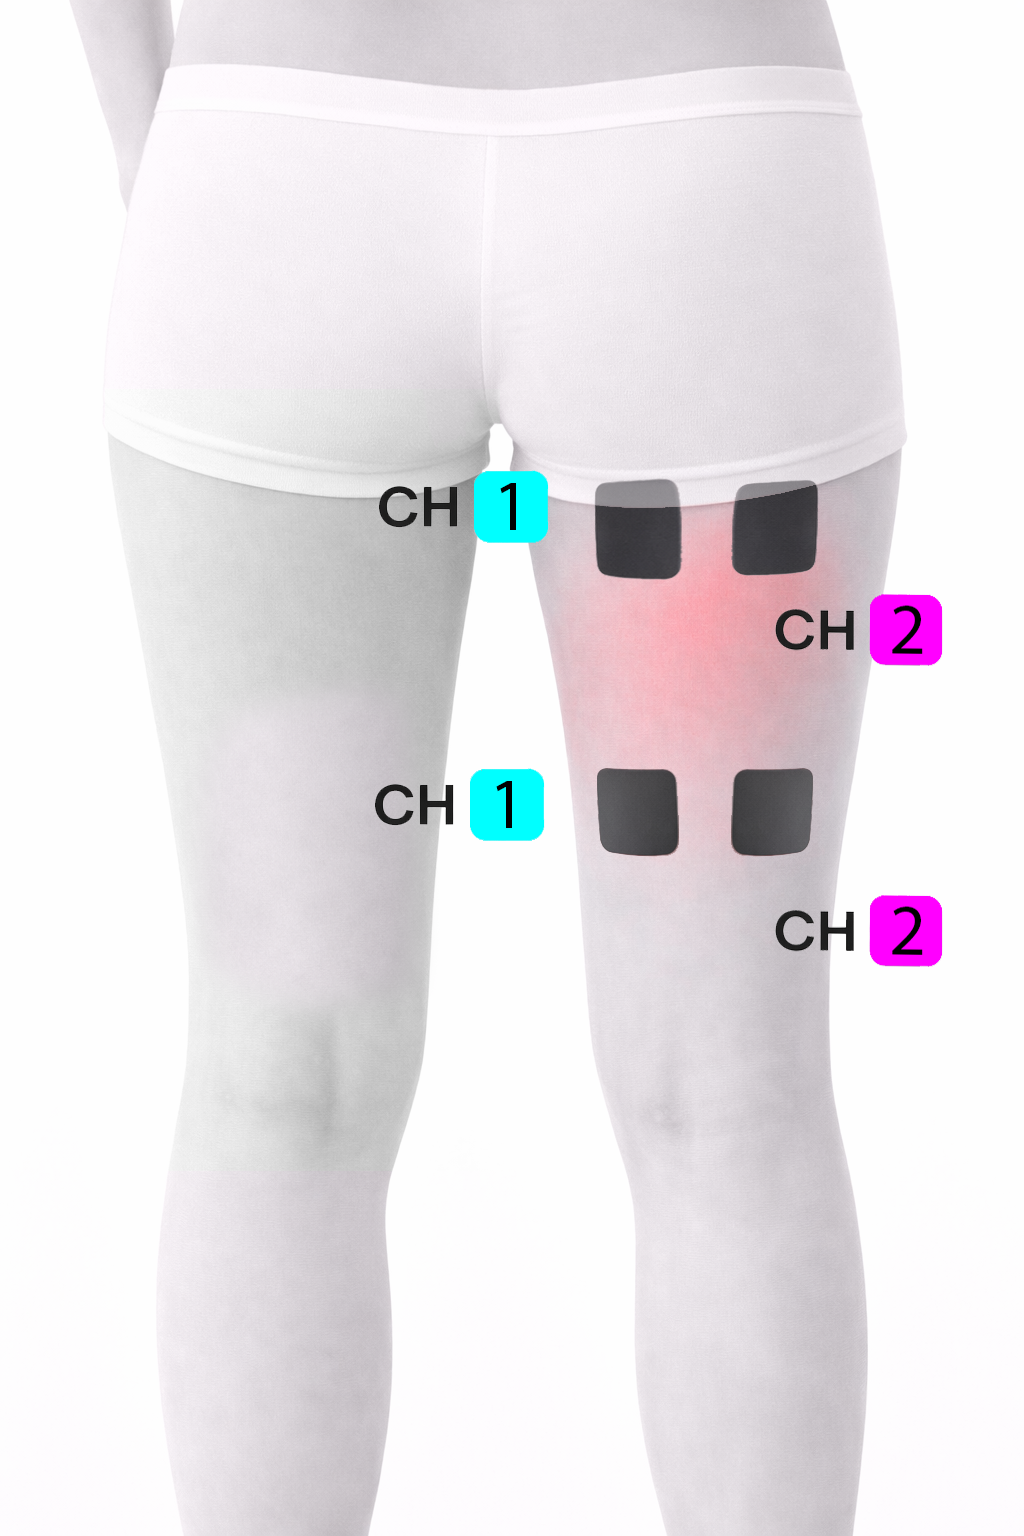
Hamstring Pain (Option 2)
Electrode Placement:
Horizontal Pair (Across the Muscle)
CH1: Place one electrode on the inner upper hamstring and one on the outer upper hamstring (just below the glute).
CH2: Place one electrode on the inner lower hamstring and one on the outer lower hamstring (mid-thigh level).
This setup targets:
Hamstring strain
Tightness after running or sprinting
Posterior thigh soreness
Mild muscle tear recovery
Pulling sensation when bending forward
The current passes across the muscle belly, covering a wider surface area.
Knee Pain
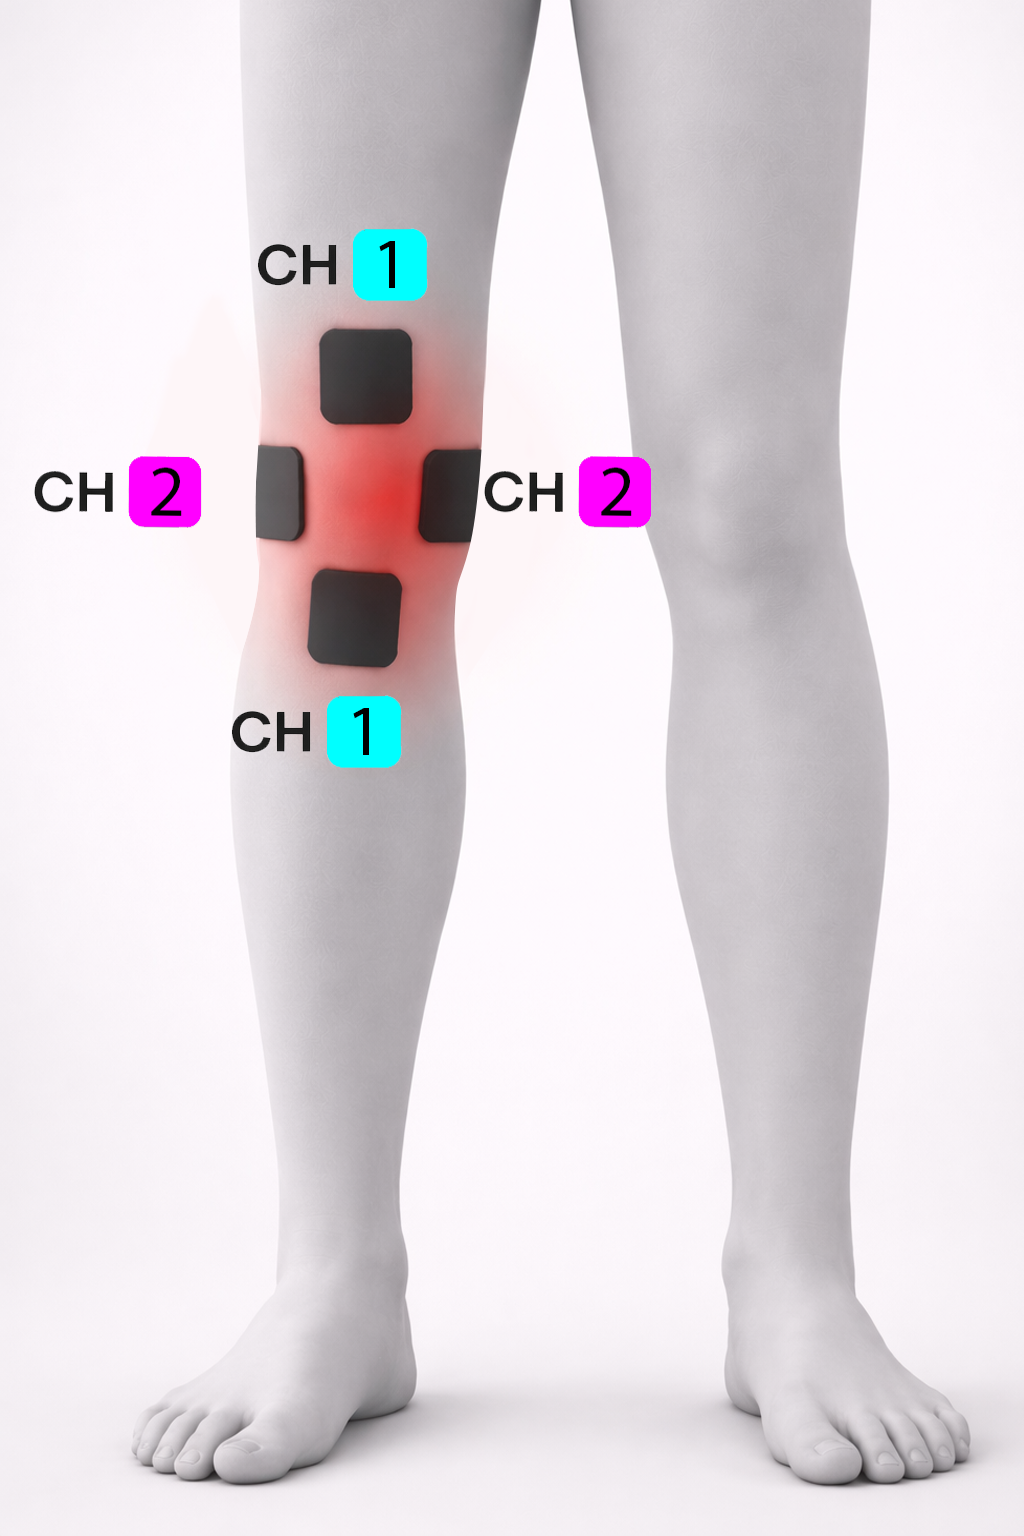
Electrode Placement:
CH1 (vertical pair):
One electrode above the knee
One electrode below the knee
CH2 (horizontal pair):
One electrode on the inner side
One electrode on the outer side
This Placement Targets:
Widespread knee pain
Swelling around the joint
Front + side knee discomfort
Arthritis-related pain
Post-injury stiffness
Do not place electrodes directly over the knee cap. Keep electrodes on soft tissue around the joint.
Calf Pain
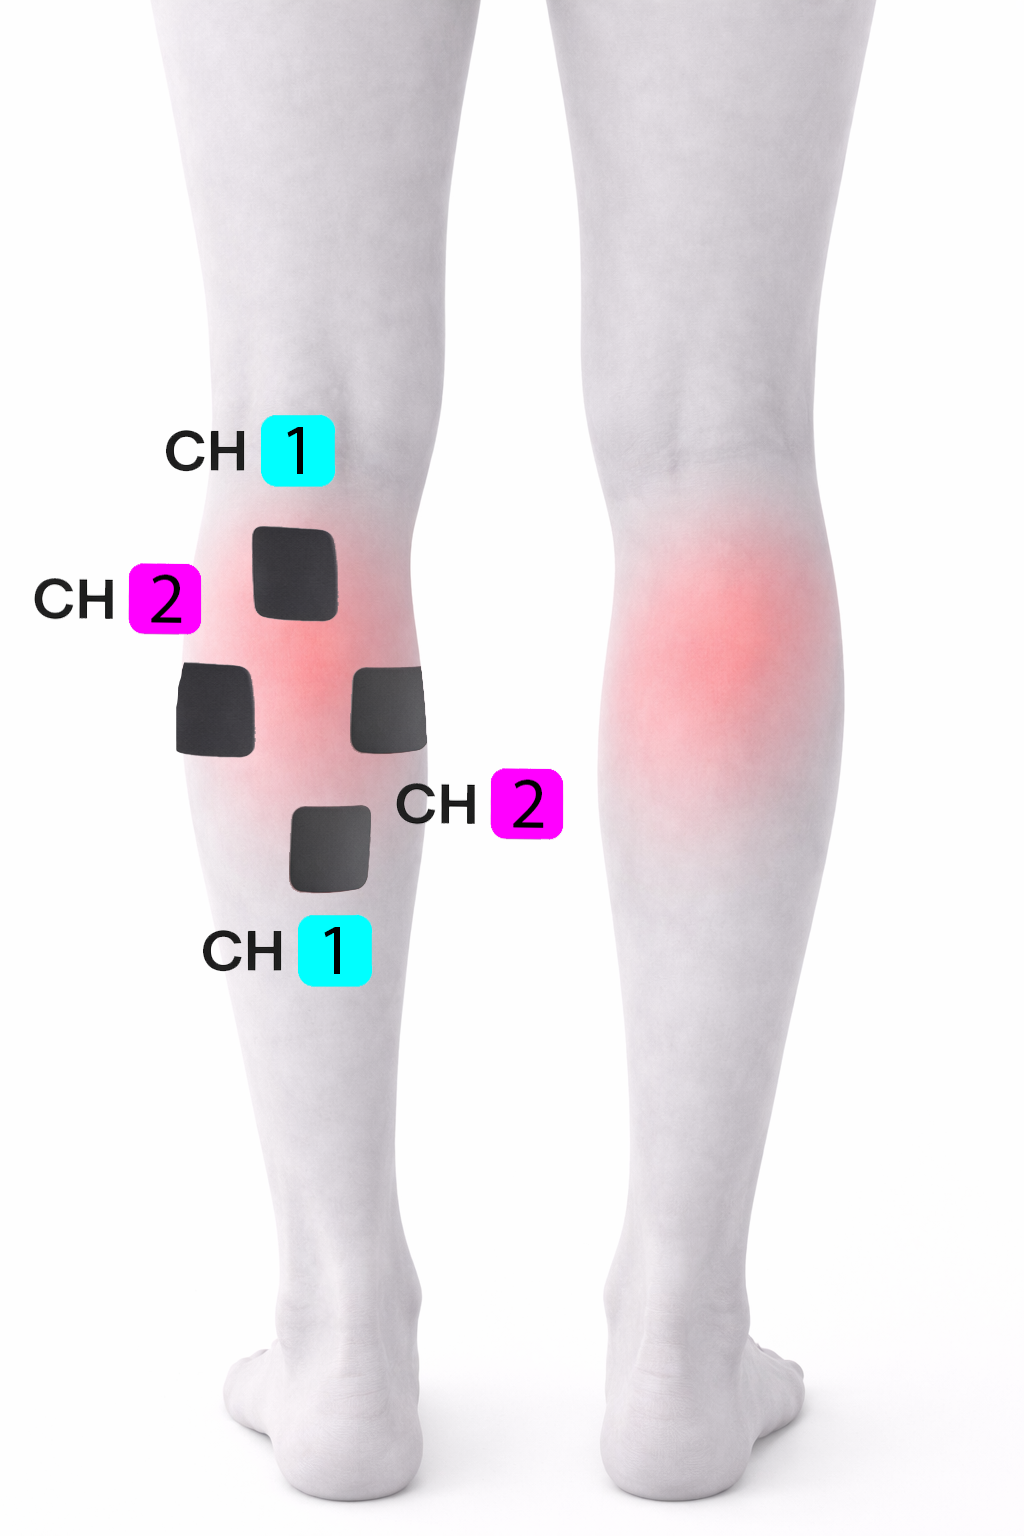

2-Channel Electrode Placement:
CH1 (Vertical pair):
One electrode on the upper calf
One electrode on the lower calf
CH2 (Horizontal pair):
One electrode on the inner calf
One electrode on the outer calf
This Placement Targets::
Widespread calf strain
Deep muscle soreness
Post-running tightness
Persistent cramping
Diffuse inflammation
The painful area sits in the centre of the cross pattern.
Also see 1 channel placement for small, local, mild pain in both legs.
Ankle Pain

Electrode Placement:
CH1: One electrode on the outer lower leg and one on the inner lower leg above the hinge joint (upper pair).
CH2: Another pair placed slightly lower the hinge joint, again inner and outer.
This setup targets:
Ankle joint pain
Swelling around the ankle
Achilles or tendon irritation
Post-sprain discomfort
General ankle stiffness
This creates two horizontal current paths that frame the ankle joint, allowing the stimulation to pass through the painful region from side to side.
Foot Pain
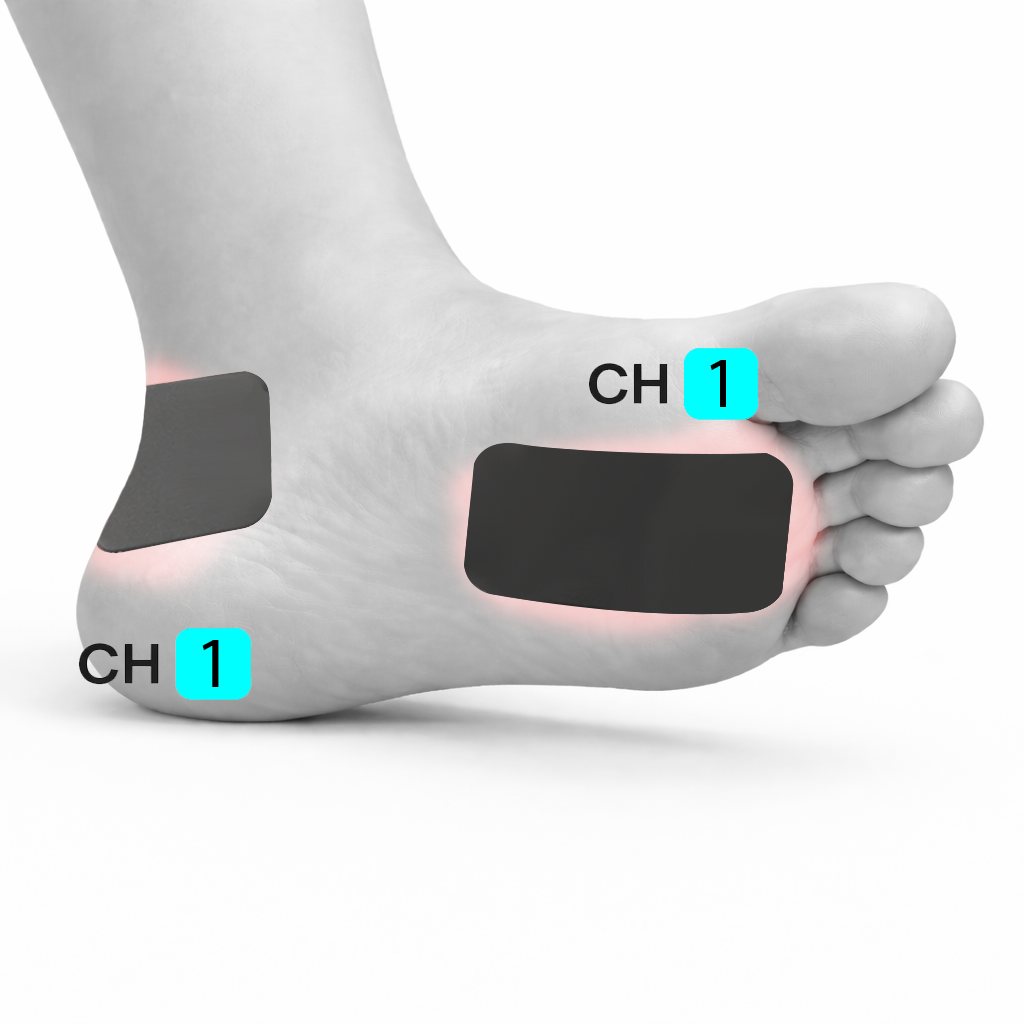
Electrode Placement:
First Electrode: On the sole of the foot (arch / plantar fascia region)
Second Electrode: On the back or side of the heel
This setup targets:
Plantar fasciitis
Heel pain
Arch pain
Pain when standing or walking
Morning first-step pain
This setting allows the current to pass through the plantar fascia and heel region.
Menstrual Pain (Front)
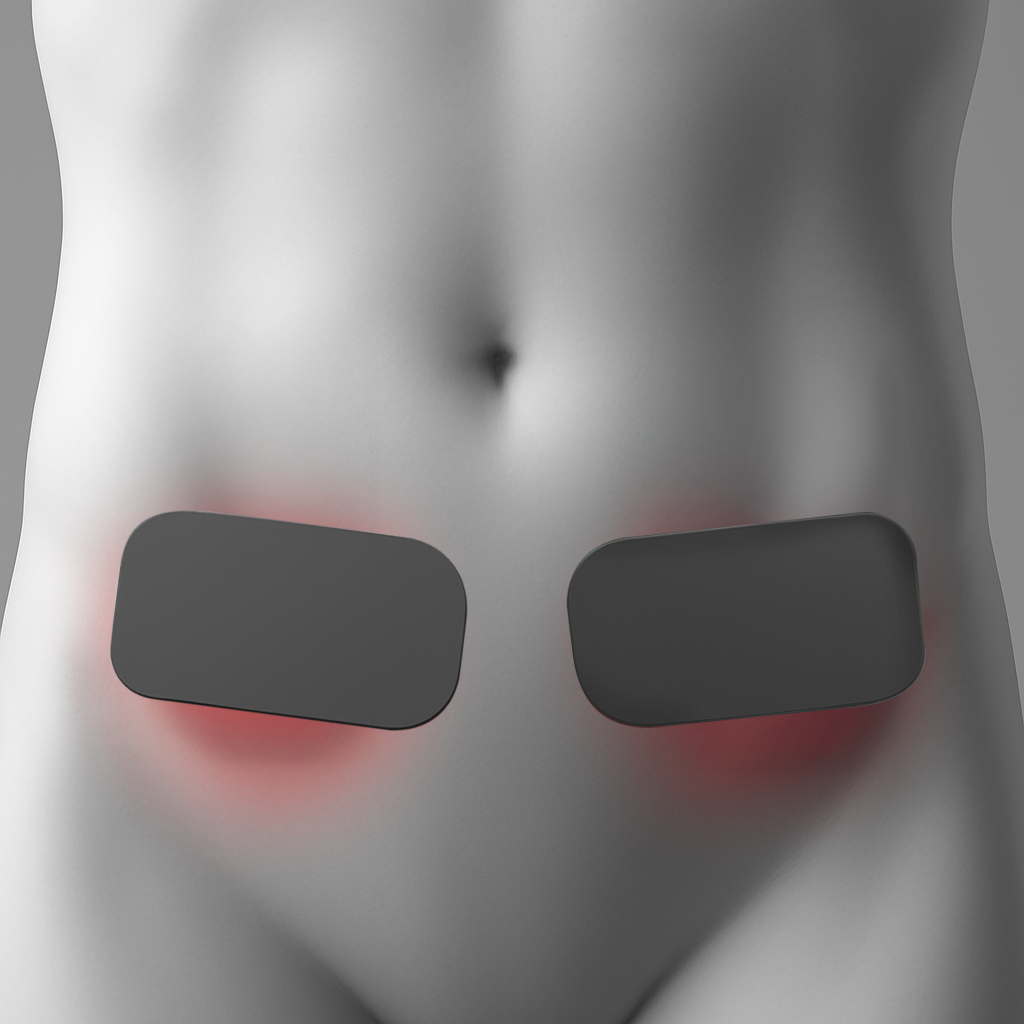
This Placement Targets:
Dull, aching menstrual discomfort
Lower abdominal cramping
Uterine-related pain
Central pelvic discomfort
Period-related muscle tension
Electrode Placement
Place one electrode on the lower left abdomen
Place one electrode on the lower right abdomen
Position electrodes below the navel, above the pubic bone
Keep electrodes on soft muscle, not directly over bone
Menstrual Pain (Back)
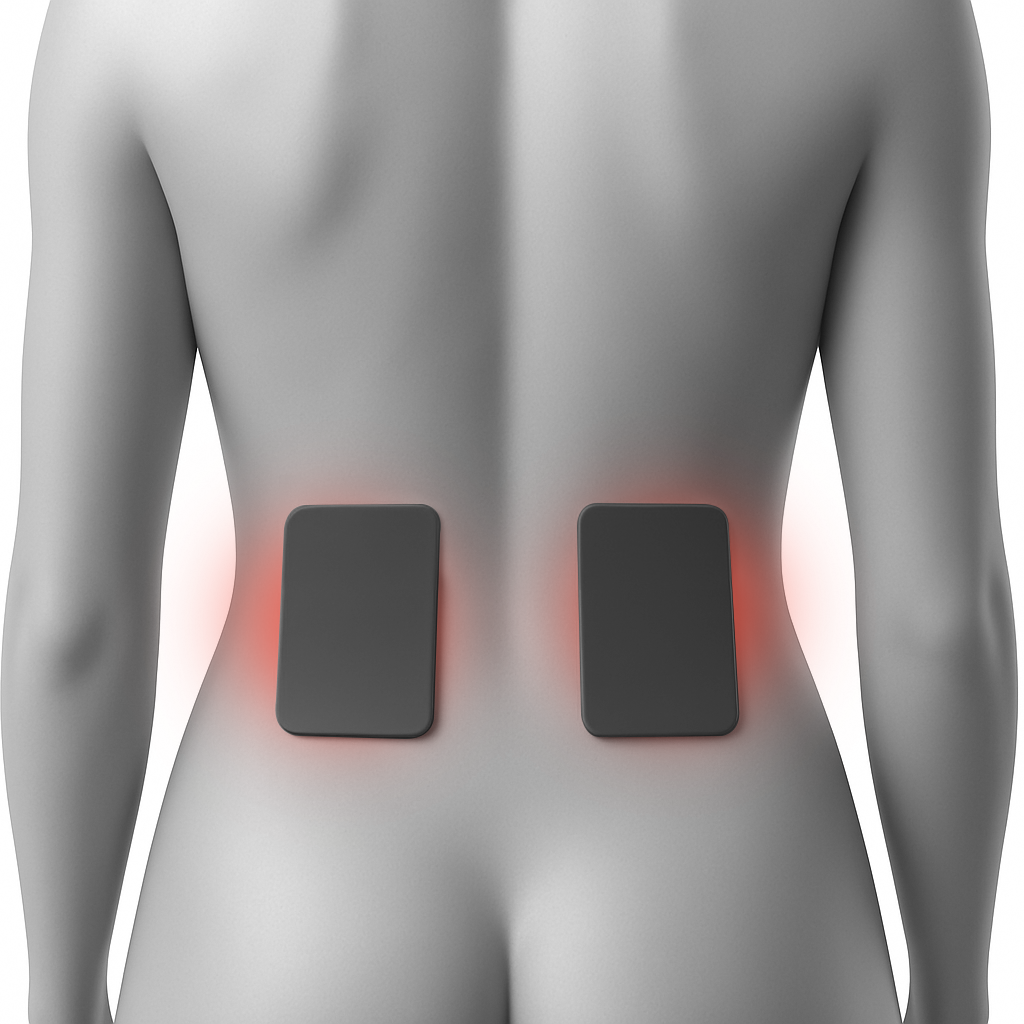
This Placement Targets:
Lower back aching during menstruation
Pelvic referred pain
Dull, heavy cramping that spreads to the back
Electrode Placement
Place one electrode on the left lower back
Place one electrode on the right lower back
Position electrodes on the soft muscle area
Keep them either side of the spine, not directly on the spine
The current passes across the lower back muscles, helping reduce referred pelvic pain and muscle tension.